The Amazon EC2 instances for your Elastic Beanstalk environment
When you create a web server environment, AWS Elastic Beanstalk creates one or more Amazon Elastic Compute Cloud (Amazon EC2) virtual machines, known as Instances.
The instances in your environment are configured to run web apps on the platform that you choose. You can make changes to various properties and behaviors of your environment's instances when you create your environment or after it's already running. Or, you can already make these changes by modifying the source code that you deploy to the environment. For for more information, see Configuration options.
Note
The Auto Scaling group in your environment manages the Amazon EC2 instances that run your application. When you make configuration changes that are described on this page, the launch configuration also changes. The launch configuration is either an Amazon EC2 launch template or an Auto Scaling group launch configuration resource. This change requires replacement of all instances. It also triggers either a rolling update or immutable update, depending on which one is configured.
Elastic Beanstalk supports several Amazon EC2 instance purchasing options: On-Demand Instances, Reserved Instances, and Spot Instances. An On-Demand Instance is a pay-as-you-go resource—there's no long-term commitment required when you use it. A Reserved Instance is a pre-purchased billing discount applied automatically to matching On-Demand instances in your environment. A Spot Instance is an unused Amazon EC2 instance that is available for less than the On-Demand price. You can enable Spot Instances in your environment by setting a single option. You can configure Spot Instance usage, including the mix of On-Demand and Spot Instances, using additional options. For more information, see Auto Scaling group.
Sections
- Amazon EC2 instance types
- Configuring Amazon EC2 instances for your environment
- Configuring AWS EC2 instances for your environment using the AWS CLI
- Recommendations for Graviton arm64 first wave environments
- The aws:autoscaling:launchconfiguration namespace
- Configuring the instance metadata service on your environment's instances
Amazon EC2 instance types
When you create a new environment, Elastic Beanstalk provisions Amazon EC2 instances that are based on the Amazon EC2 instance types that you choose. The instance types that you choose determine the host hardware that runs your instances. EC2 instance types can be categorized by which processor architecture each is based on. Elastic Beanstalk supports instance types based on the following processor architectures: AWS Graviton 64-bit Arm architecture (arm64), 64-bit architecture (x86), and 32-bit architecture (i386). Elastic Beanstalk selects the x86 processor architecture by default when you create a new environment.
Note
The i386 32-bit architecture is no longer supported by the majority of Elastic Beanstalk platforms. We recommended that you choose the x86 or arm64 architecture types instead. Elastic Beanstalk provides configuration options for i386 processor instance types in the aws:ec2:instances namespace.
All of the instance types in the configuration for a given Elastic Beanstalk environment must have the same type of processor architecture. Assume that you add a new instance type to an existing environment that already has a t2.medium instance type, which is based on x86 architecture. You can only add another instance type of the same architecture, such as t2.small. If you want to replace the existing instance types with those from a different architecture, you can do so. But make sure that all of the instance types in the command are based on the same type of architecture.
Elastic Beanstalk regularly adds support for new compatible instance types after Amazon EC2 introduces them. For information about instance types that are available, see Instance types in the Amazon EC2 User Guide for Linux Instances or Instance types in the Amazon EC2 User Guide for Windows Instances.
Note
Elastic Beanstalk now offers support for Graviton on all of the latest Amazon Linux 2 platforms across all AWS Graviton supported Regions. For more information about creating an Elastic Beanstalk environment with arm64 based instances types, see Configuring Amazon EC2 instances for your environment.
Create new environments that run Amazon EC2 instances on arm64 architecture and migrate your existing applications to them with the deployment options in Elastic Beanstalk.
To learn more about Graviton arm64 based processors, see these AWS resources:
-
Benefits — The AWS Graviton Processor
-
Getting started and other topics, such as Language-specific considerations — Getting started with AWS Graviton
GitHub article
Configuring Amazon EC2 instances for your environment
You can create or modify your Elastic Beanstalk environment's Amazon EC2 instance configuration in the Elastic Beanstalk console.
Note
Although the Elastic Beanstalk console doesn't provide the option to change the processor architecture of an existing environment, you can do so with the AWS CLI. For example commands, see Configuring AWS EC2 instances for your environment using the AWS CLI.
To configure Amazon EC2 instances in the Elastic Beanstalk console during environment creation
Open the Elastic Beanstalk console
, and in the Regions list, select your AWS Region. -
In the navigation pane, choose Environments.
-
Choose Create a new environment to start creating your environment.
-
On the wizard's main page, before choosing Create environment, choose Configure more options.
-
In the Instances configuration category, choose Edit. Make changes to settings in this category, and then choose Apply. For setting descriptions, see the section Instances category settings on this page.
-
In the Capacity configuration category, choose Edit. Make changes to settings in this category, and then choose Continue. For setting descriptions, see the section Capacity category settings on this page.
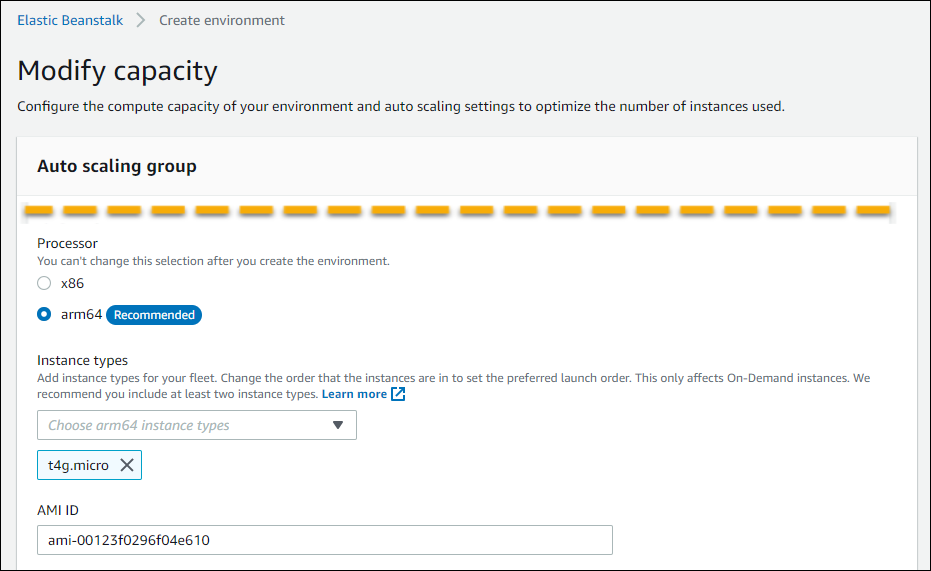
Selecting processor architecture
Scroll down to Processor to select a processor architecture for your EC2 instances. The console lists processor architectures that are supported by the platform that you chose earlier in the Create environment panel.
If you don't see the processor architecture that you need, return to the configuration category list to select a platform that supports it. From the Modify Capacity panel, choose Cancel. Then, choose Change platform version to choose new platform settings. Next, in the Capacity configuration category choose Edit tot see the processor architecture choices again.
-
Choose Save, and then make any other configuration changes that your environment requires.
-
Choose Create environment.
To configure a running environment’s Amazon EC2 instances in the Elastic Beanstalk console
Open the Elastic Beanstalk console
, and in the Regions list, select your AWS Region. -
In the navigation pane, choose Environments, and then choose the name of your environment from the list.
Note
If you have many environments, use the search bar to filter the environment list.
In the navigation pane, choose Configuration.
-
In the Instances configuration category, choose Edit. Make changes to settings in this category, and then choose Apply. For setting descriptions, see the section Instances category settings on this page.
-
In the Capacity configuration category, choose Edit. Make changes to settings in this category, and then choose Continue. For setting descriptions, see the section Capacity category settings on this page.
Instances category settings
The following settings related to Amazon EC2 instances are available in the Instances configuration category.
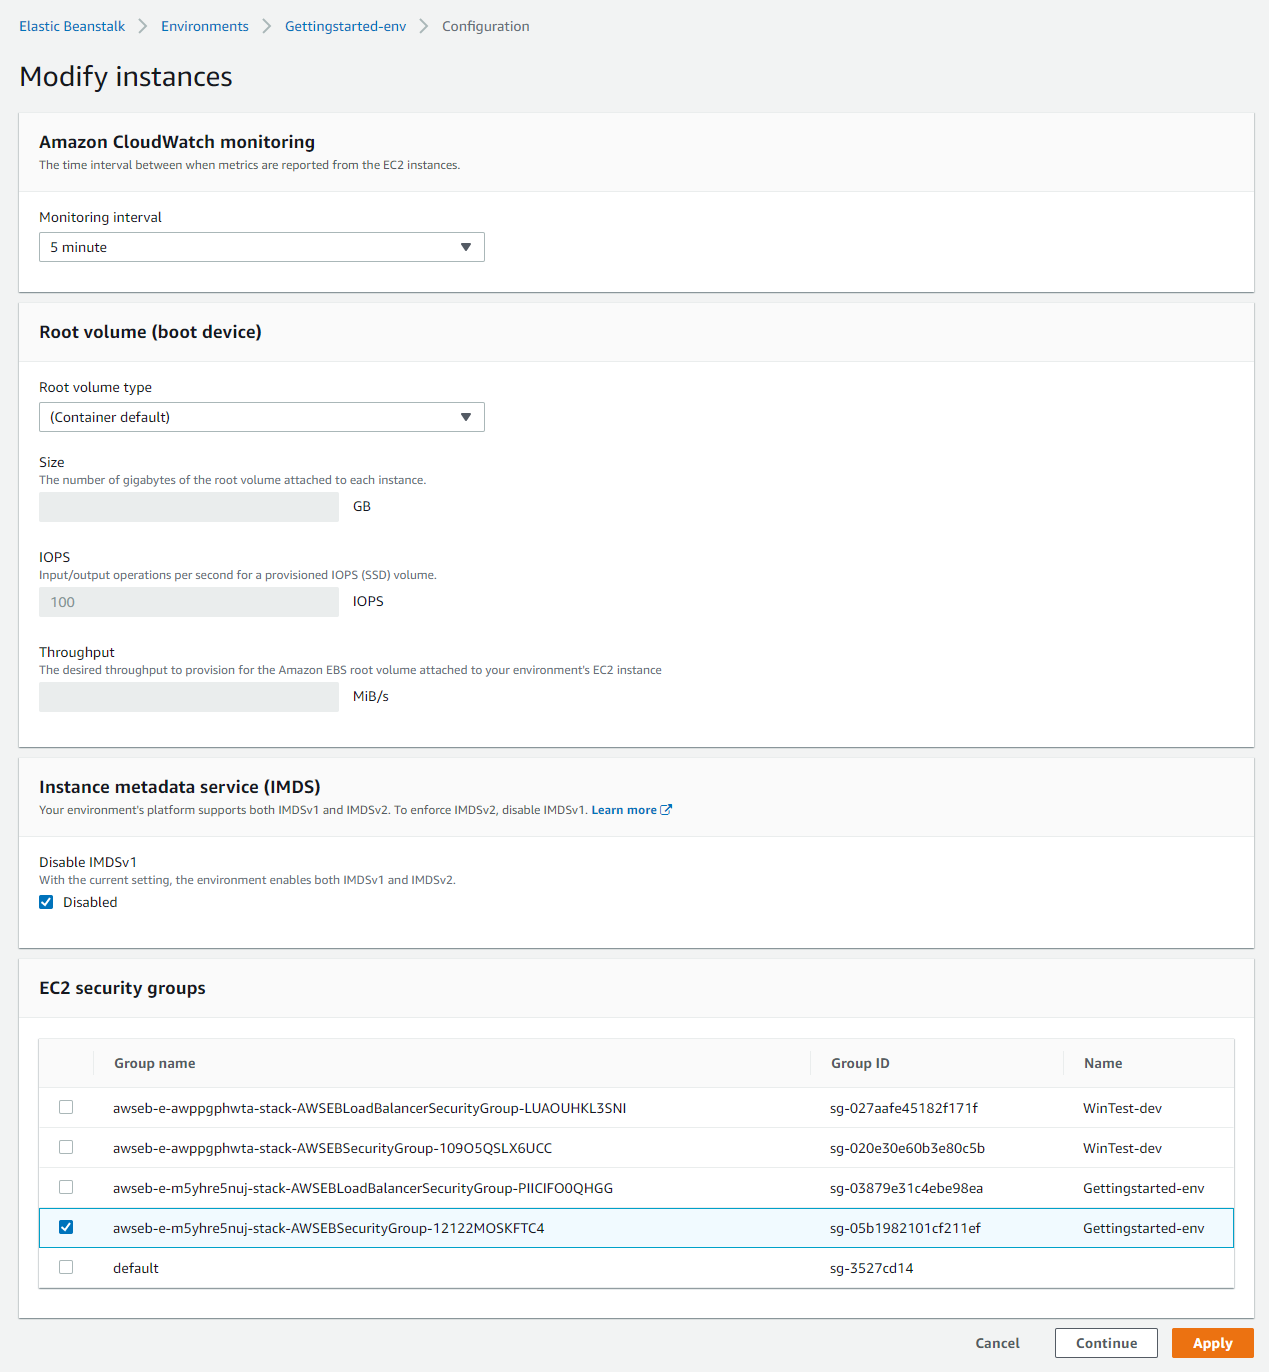
Monitoring interval
By default, the instances in your environment publish basic health metrics to Amazon CloudWatch at five-minute intervals at no additional cost.
For more detailed reporting, you can set the Monitoring interval to 1 minute to increase the frequency
that the resources in your environment publish basic health metrics to CloudWatch at. CloudWatch service
charges apply for one-minute interval metrics. For more information, see Amazon CloudWatch
Root volume (boot device)
Each instance in your environment is configured with a root volume. The root volume is the Amazon EBS block device attached to the instance to store the operating system, libraries, scripts, and your application source code. By default, all platforms use general-purpose SSD block devices for storage.
You can modify Root volume type to use magnetic storage or provisioned IOPS SSD volume types and, if needed, increase the volume size. For provisioned IOPS volumes, you must also select the number of IOPS to provision. Throughput is only applicable to gp3 SSD volume types. You might enter the desired throughput to provision. It can range between 125 and 1000 mebibytes per second (MiB/s). Select the volume type that meets your performance and price requirements.
For more information, see Amazon EBS Volume Types in the Amazon EC2 User Guide for Linux Instances
and Amazon EBS Product Details
Instance metadata service
The instance metadata service (IMDS) is an on-instance component that code on the instance uses to securely access instance metadata. Code can access instance metadata from a running instance using one of two methods. They are Instance Metadata Service Version 1 (IMDSv1) or Instance Metadata Service Version 2 (IMDSv2). IMDSv2 is more secure. Disable IMDSv1 to enforce IMDSv2. For more information, see Configuring the instance metadata service on your environment's instances.
Note
The IMDS section on this configuration page appears only for platform versions that support IMDSv2.
Security groups
The security groups that are attached to your instances determine which traffic is allowed to reach the instances. They also determine which traffic is allowed to leave the instances. Elastic Beanstalk creates a security group that allows traffic from the load balancer on the standard ports for HTTP (80) and HTTPS (443).
You can specify additional security groups that you have created to allow traffic on other ports or from other sources. For example, you can create a security group for SSH access that allows inbound traffic on port 22 from a restricted IP address range. Otherwise, for additional security, create one that allows traffic from a bastion host that only you have access to.
Note
To allow traffic between environment A's instances and environment B's instances, you can add a rule to the security group that Elastic Beanstalk attached to environment B. Then, you can specify the security group that Elastic Beanstalk attached to environment A. This allows inbound traffic from, or outbound traffic to, environment A's instances. However, doing so creates a dependency between the two security groups. If you later try to terminate environment A, Elastic Beanstalk can't delete the environment's security group, because environment B's security group is dependent on it.
Therefore, we recommend that you instead first create a separate security group. Then, attach it to environment A, and specify it in a rule of environment B's security group.
For more information about Amazon EC2 security groups, see Amazon EC2 Security Groups in the Amazon EC2 User Guide for Linux Instances.
Capacity category settings
The following settings related to Amazon EC2 instances are available in the Capacity configuration category.
Options
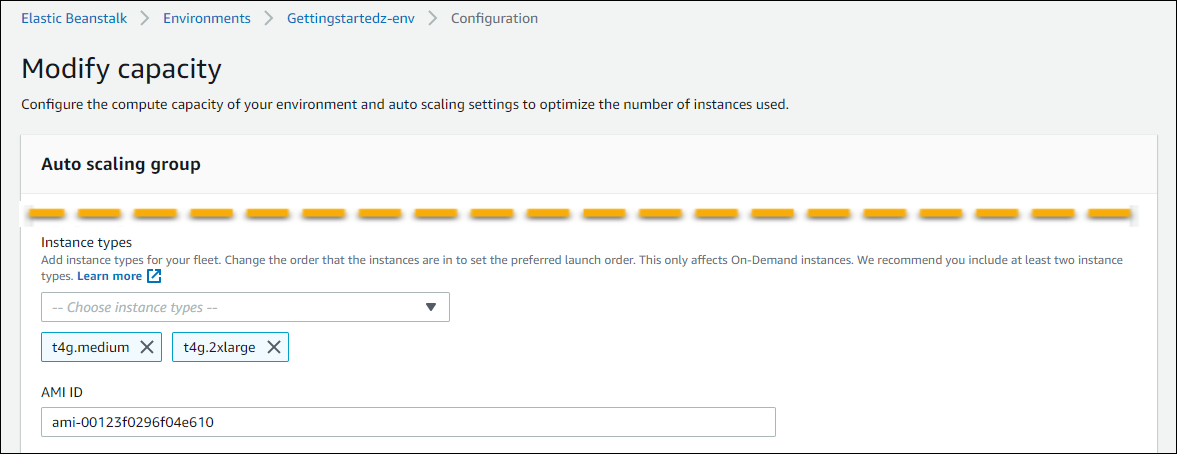
Instance types
The Instance types setting determines the type of Amazon EC2 instance that's launched to run your application. This configuration page shows a list of Instance types. You can select one or more instance types. The Elastic Beanstalk console only displays the instance types based on the processor architecture that's configured for your environment. Therefore, you can only add instance types of the same processor architecture.
Note
Although the Elastic Beanstalk console doesn't provide the option to change the processor architecture of an existing environment, you can do so with the AWS CLI. For example commands, see Configuring AWS EC2 instances for your environment using the AWS CLI.
Choose an instance that's powerful enough to run your application under load, but not so powerful that it's idle most of the time. For development purposes, the t2 family of instances provides a moderate amount of power with the ability to burst for short periods of time. For large-scale, high-availability applications, use a pool of instances to ensure that capacity isn't too strongly affected if any single instance goes down. Start with an instance type that you can use to run five instances under moderate loads during normal hours. If any instance fails, the rest of the instances can absorb the rest of the traffic. The capacity buffer also allows time for the environment to scale up as traffic begins to rise during peak hours.
For more information about Amazon EC2 instance families and types, see Instance types in the Amazon EC2 User Guide for Linux Instances or Instance types in the Amazon EC2 User Guide for Windows Instances. To determine which instance types meet your requirements and their supported Regions, see Available instance types in the Amazon EC2 User Guide for Linux Instances or Available instance types in the Amazon EC2 User Guide for Windows Instances.
AMI ID
The Amazon Machine Image (AMI) is the Amazon Linux or Windows Server machine image that Elastic Beanstalk uses to launch Amazon EC2 instances in your environment. Elastic Beanstalk provides machine images that contain the tools and resources required to run your application.
Elastic Beanstalk selects a default AMI for your environment based on the Region, platform version and processor architecture that you choose. If you have created a custom AMI, replace the default AMI ID with your own default custom one.
Configuring AWS EC2 instances for your environment using the AWS CLI
Use the AWS Command Line Interface (AWS CLI) to create and configure Elastic Beanstalk environments using commands in your command-line shell. This section provides examples of the create-environment and update-environment commands.
The first two examples creates a new environment. The command specifies an Amazon EC2 instances type, t4g.small, that's based on arm64 processor
architecture. Elastic Beanstalk defaults the Image ID (AMI) for the EC2 instances based on the Region, platform version and instance type. The instance type
corresponds to a processor architecture. The solution-stack-name parameter applies to platform version.
Example 1 — create a new arm64 based environment (namespace options inline)
aws elasticbeanstalk create-environment \ --regionus-east-1\ --application-namemy-app\ --environment-namemy-env\ --solution-stack-name"64bit Amazon Linux 2 v3.4.7 running Docker"\ --option-settings \ Namespace=aws:autoscaling:launchconfiguration,OptionName=IamInstanceProfile,Value=aws-elasticbeanstalk-ec2-role\ Namespace=aws:ec2:instances,OptionName=InstanceTypes,Value=t4g.small
As an alternative, use an options.json file to specify the namespace options instead of including them inline.
Example 2 — create a new arm64 based environment (namespace options in options.json file)
aws elasticbeanstalk create-environment \ --regionus-east-1\ --application-namemy-app\ --environment-namemy-env\ --solution-stack-name"64bit Amazon Linux 2 v3.4.7 running Docker"\ --option-settingsfile://options.json
### example options.json ###
[
  {
    "Namespace": "aws:autoscaling:launchconfiguration",
    "OptionName": "IamInstanceProfile",
    "Value": "aws-elasticbeanstalk-ec2-role"
  },
  {
    "Namespace": "aws:ec2:instances",
    "OptionName": "InstanceTypes",
    "Value": "t4g.small"
  }
]
The next two examples update the configuration for an existing environment with the update-environment command. In this example we're adding another instance type that's also based on arm64 processor architecture. For existing environments, all instance types that are added must have the same processor architecture. If you want to replace the existing instance types with those from a different architecture, you can do so. But make sure that all of the instance types in the command have the same type of architecture.
Example 3 — update an existing arm64 based environment (namespace options inline)
aws elasticbeanstalk update-environment \ --regionus-east-1\ --application-namemy-app\ --environment-namemy-env\ --solution-stack-name"64bit Amazon Linux 2 v3.4.7 running Docker"\ --option-settings \ Namespace=aws:autoscaling:launchconfiguration,OptionName=IamInstanceProfile,Value=aws-elasticbeanstalk-ec2-role\ Namespace=aws:ec2:instances,OptionName=InstanceTypes,Value=t4g.small,t4g.micro
As an alternative, use an options.json file to specify the namespace options instead of including them inline.
Example 4 — update an existing arm64 based environment (namespace options in options.json file)
aws elasticbeanstalk update-environment \ --regionus-east-1\ --application-namemy-app\ --environment-namemy-env\ --solution-stack-name"64bit Amazon Linux 2 v3.4.7 running Docker"\ --option-settingsfile://options.json
### example options.json ###
[
  {
    "Namespace": "aws:autoscaling:launchconfiguration",
    "OptionName": "IamInstanceProfile",
    "Value": "aws-elasticbeanstalk-ec2-role"
  },
  {
    "Namespace": "aws:ec2:instances",
    "OptionName": "InstanceTypes",
    "Value": "t4g.small, t4g.micro"
  }
]
The next two examples show more create-environment commands. These examples don't provide values for InstanceTypes. When InstanceTypes values aren't
specified, Elastic Beanstalk defaults to x86 based processor architecture. The Image ID (AMI) for the environment's EC2 instances will default according to the
Region, platform version and defaulted instance type. The instance type corresponds to a processor architecture.
Example 5 — create a new x86 based environment (namespace options inline)
aws elasticbeanstalk create-environment \ --regionus-east-1\ --application-namemy-app\ --environment-namemy-env\ --solution-stack-name"64bit Amazon Linux 2 v3.4.7 running Docker"\ --option-settings \ Namespace=aws:autoscaling:launchconfiguration,OptionName=IamInstanceProfile,Value=aws-elasticbeanstalk-ec2-role
As an alternative, use an options.json file to specify the namespace options instead of including them inline.
Example 6 — create a new x86 based environment (namespace options in options.json file)
aws elasticbeanstalk create-environment \ --regionus-east-1\ --application-namemy-app\ --environment-namemy-env\ --solution-stack-name"64bit Amazon Linux 2 v3.4.7 running Docker"\ --option-settingsfile://options.json
### example options.json ###
[
  {
    "Namespace": "aws:autoscaling:launchconfiguration",
    "OptionName": "IamInstanceProfile",
    "Value": "aws-elasticbeanstalk-ec2-role"
  }
]
Recommendations for Graviton arm64 first wave environments
Note
This section only applies to a subset of customers. If you created a new environment with Graviton arm64 based instance types prior to November 24, 2021, the information in this section may apply to you.
Starting in October and November 2021, Elastic Beanstalk started to add waves of support for Graviton arm64 processors in some Regions and for some platform versions. This first wave was announced in the AWS Elastic Beanstalk Release Notes dated October 13, October 21 and November 19 of 2021. If you created arm64 based environments then, the instructions told you to configure the instances with custom AMIs provided in the release notes. Now that enhanced support for Graviton arm64 is available, Elastic Beanstalk defaults the AMIs for the arm64 instance types in the latest platform versions.
If you created environments with the custom AMIs provided in the first wave releases, we recommend you do the following to maintain a healthy and working environment.
-
Remove the custom AMIs from your environment.
-
Update the environment with the most recent platform version.
-
Set up managed platform updates to automatically upgrade to the latest platform version during a scheduled maintenance window.
Note
Elastic Beanstalk will not automatically replace the custom AMIs. You must delete the custom AMIs in Step 1, so the next platform update in Step 2 will update them.
The procedure that follows guides you through these steps. The AWS CLI examples apply to an environment that was created with the following information.
aws elasticbeanstalk create-environment \ --regionus-east-1\ --application-namemy-app\ --environment-namemy-env\ --solution-stack-name"64bit Amazon Linux 2 v3.4.7 running Docker"\ --option-settings \ Namespace=aws:autoscaling:launchconfiguration,OptionName=IamInstanceProfile,Value=aws-elasticbeanstalk-ec2-role\ Namespace=aws:ec2:instances,OptionName=InstanceTypes,Value=t4g.small\ Namespace=aws:autoscaling:launchconfiguration,OptionName=ImageId,Value=ami-0fbdb88ce139244bf
To update arm64 environments created under first wave of Graviton arm64 support
-
Run update-environment to remove the custom AMIs settings.
aws elasticbeanstalk update-environment \ --regionus-east-1\ --environment-namemy-env\ --options-to-remove \ Namespace=aws:autoscaling:launchconfiguration,OptionName=ImageId -
Update the environment with the most recent platform version. Choose from one of the following options.
-
Console option — Use the Elastic Beanstalk console to update the platform version. For more information, see Update your environment's platform version.
-
AWS CLI Option— Run the AWS update-environment command, specifying the most recently available platform version.
aws elasticbeanstalk update-environment \ --regionus-east-1\ --environment-namemy-env\ --solution-stack-name"64bit Amazon Linux 2 v3.4.9 running Docker"Note
The list-available-solution-stacks command provides a list of the platform versions available for your account in an AWS Region.
aws elasticbeanstalk list-available-solution-stacks --regionus-east-1--query SolutionStacks
-
-
Use the Elastic Beanstalk console to set up managed platform updates for your environment. Managed platform updates automatically upgrade your environment to the latest platform version during a scheduled maintenance window. Your application remains in service during the update process. For more information, see managed platform updates.
The aws:autoscaling:launchconfiguration namespace
You can use the configuration options in the aws:autoscaling:launchconfiguration namespace to configure the
instances for your environment, including additional options that aren't available in the console.
The following configuration file example uses the basic configuration options that are in this topic. For example,
it uses the DisableIMDSv1 option, which is discussed in IMDS. It also uses the EC2KeyName and IamInstanceProfile options that are
discussed in Security, and the
BlockDeviceMappings option, which isn't available in the console.
option_settings:
  aws:autoscaling:launchconfiguration:
    SecurityGroups: my-securitygroup
    MonitoringInterval: "1 minute"
    DisableIMDSv1: false
    EC2KeyName: my-keypair
    IamInstanceProfile: "aws-elasticbeanstalk-ec2-role"
    BlockDeviceMappings: "/dev/sdj=:100,/dev/sdh=snap-51eef269,/dev/sdb=ephemeral0"
You can use BlockDeviceMappings to configure additional block devices for your instances. For more information, see Block Device Mapping in the Amazon EC2 User Guide for Linux Instances.
The EB CLI and Elastic Beanstalk console apply recommended values for the preceding options. You must remove these settings if you want to use configuration files to configure the same. See Recommended values for details.
