What is Amazon EC2 Auto Scaling?
Amazon EC2 Auto Scaling helps you ensure that you have the correct number of Amazon EC2 instances available to handle the load for your application. You create collections of EC2 instances, called Auto Scaling groups. You can specify the minimum number of instances in each Auto Scaling group, and Amazon EC2 Auto Scaling ensures that your group never goes below this size. You can specify the maximum number of instances in each Auto Scaling group, and Amazon EC2 Auto Scaling ensures that your group never goes above this size. If you specify the desired capacity, either when you create the group or at any time thereafter, Amazon EC2 Auto Scaling ensures that your group has this many instances. If you specify scaling policies, then Amazon EC2 Auto Scaling can launch or terminate instances as demand on your application increases or decreases.
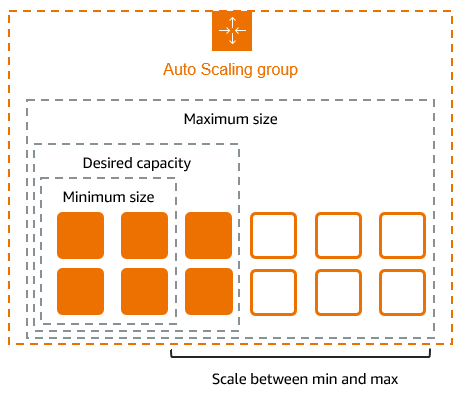
For example, the following Auto Scaling group has a minimum size of four instances, a desired capacity of six instances, and a maximum size of twelve instances. The scaling policies that you define adjust the number of instances, within your minimum and maximum number of instances, based on the criteria that you specify.
Features of Amazon EC2 Auto Scaling
With Amazon EC2 Auto Scaling, your EC2 instances are organized into Auto Scaling groups so that they can be treated as a logical unit for the purposes of scaling and management. Auto Scaling groups use launch templates (or launch configurations) as configuration templates for their EC2 instances.
The following are key features of Amazon EC2 Auto Scaling:
- Monitoring the health of running instances
-
Amazon EC2 Auto Scaling automatically monitors the health and availability of your instances using EC2 health checks and replaces terminated or impaired instances to maintain your desired capacity.
- Custom health checks
-
In addition to the built-in health checks, you can define custom health checks that are specific to your application to verify that it's responding as expected. If an instance fails your custom health check, it's automatically replaced to maintain your desired capacity.
- Balancing capacity across Availability Zones
-
You can specify multiple Availability Zones for your Auto Scaling group, and Amazon EC2 Auto Scaling balances your instances evenly across the Availability Zones as the group scales. This provides high availability and resiliency by protecting your applications from failures in a single location.
- Multiple instance types and purchase options
-
Within a single Auto Scaling group, you can launch multiple instance types and purchase options (Spot and On-Demand Instances), allowing you to optimize costs through Spot Instance usage. You can also take advantage of Reserved Instance and Savings Plan discounts by using them in conjunction with On-Demand Instances in the group.
- Automated replacement of Spot Instances
-
If your group includes Spot Instances, Amazon EC2 Auto Scaling can automatically request replacement Spot capacity if your Spot Instances are interrupted. Through Capacity Rebalancing, Amazon EC2 Auto Scaling can also monitor and proactively replace your Spot Instances that are at an elevated risk of interruption.
- Load balancing
-
You can use Elastic Load Balancing load balancing and health checks to ensure an even distribution of application traffic to your healthy instances. Whenever instances are launched or terminated, Amazon EC2 Auto Scaling automatically registers and deregisters the instances from the load balancer.
- Scalability
-
Amazon EC2 Auto Scaling also provides several ways for you to scale your Auto Scaling groups. Using auto scaling allows you to maintain application availability and reduce costs by adding capacity to handle peak loads and removing capacity when demand is lower. You can also manually adjust the size of your Auto Scaling group as needed.
- Instance refresh
-
The instance refresh feature provides a mechanism to update instances in a rolling fashion when you update your AMI or launch template. You can also use a phased approach, known as a canary deployment, to test a new AMI or launch template on a small set of instances before rolling it out to the whole group.
- Lifecycle hooks
-
Lifecycle hooks are useful for defining custom actions that are invoked as new instances launch or before instances are terminated. This feature is particularly useful for building event-driven architectures, but it also helps you manage instances through their lifecycle.
- Support for stateful workloads
-
Lifecycle hooks also offer a mechanism for persisting state on shut down. To ensure continuity for stateful applications, you can also use scale-in protection or custom termination policies to prevent instances with long-running processes from terminating early.
For more information about the benefits of Amazon EC2 Auto Scaling, see Amazon EC2 Auto Scaling benefits.
Pricing for Amazon EC2 Auto Scaling
There are no additional fees with Amazon EC2 Auto Scaling, so it's easy to try it out and see how it can benefit your AWS architecture. You only pay for the AWS resources (for example, EC2 instances, EBS volumes, and CloudWatch alarms) that you use.
Get started
To begin, complete the Create your first Auto Scaling group tutorial to create an Auto Scaling group and see how it responds when an instance in that group terminates.
Work with Auto Scaling groups
You can create, access, and manage your Auto Scaling groups using any of the following interfaces:
-
AWS Management Console – Provides a web interface that you can use to access your Auto Scaling groups. If you've signed up for an AWS account, you can access your Auto Scaling groups by signing into the AWS Management Console, using the search box on the navigation bar to search for Auto Scaling groups, and then choosing Auto Scaling groups.
-
AWS Command Line Interface (AWS CLI) – Provides commands for a broad set of AWS services, and is supported on Windows, macOS, and Linux. To get started, see Prepare to use the AWS CLI. For more information, see autoscaling in the AWS CLI Command Reference.
-
AWS Tools for Windows PowerShell – Provides commands for a broad set of AWS products for those who script in the PowerShell environment. To get started, see the AWS Tools for Windows PowerShell User Guide. For more information, see the AWS Tools for PowerShell Cmdlet Reference.
-
AWS SDKs – Provides language-specific API operations and takes care of many of the connection details, such as calculating signatures, handling request retries, and handling errors. For more information, see AWS SDKs
. -
Query API – Provides low-level API actions that you call using HTTPS requests. Using the Query API is the most direct way to access AWS services. However, it requires your application to handle low-level details such as generating the hash to sign the request, and handling errors. For more information, see the Amazon EC2 Auto Scaling API Reference.
-
AWS CloudFormation – Supports creating Auto Scaling groups using CloudFormation templates. For more information, see Create Auto Scaling groups with AWS CloudFormation.
To connect programmatically to an AWS service, you use an endpoint. For information about endpoints for calls to Amazon EC2 Auto Scaling, see Amazon EC2 Auto Scaling endpoints and quotas in the AWS General Reference.
