Configure route tables
A route table contains a set of rules, called routes, that determine where network traffic from your subnet or gateway is directed.
Contents
Route table concepts
The following are the key concepts for route tables.
-
Main route table—The route table that automatically comes with your VPC. It controls the routing for all subnets that are not explicitly associated with any other route table.
-
Custom route table—A route table that you create for your VPC.
-
Destination—The range of IP addresses where you want traffic to go (destination CIDR). For example, an external corporate network with the CIDR
172.16.0.0/12. -
Target—The gateway, network interface, or connection through which to send the destination traffic; for example, an internet gateway.
-
Route table association—The association between a route table and a subnet, internet gateway, or virtual private gateway.
-
Subnet route table—A route table that's associated with a subnet.
-
Local route—A default route for communication within the VPC.
-
Propagation—If you've attached a virtual private gateway to your VPC and enable route propagation, we automatically add routes for your VPN connection to your subnet route tables. This means that you don't need to manually add or remove VPN routes. For more information, see Site-to-Site VPN routing options in the Site-to-Site VPN User Guide.
-
Gateway route table—A route table that's associated with an internet gateway or virtual private gateway.
-
Edge association—A route table that you use to route inbound VPC traffic to an appliance. You associate a route table with the internet gateway or virtual private gateway, and specify the network interface of your appliance as the target for VPC traffic.
-
Transit gateway route table—A route table that's associated with a transit gateway. For more information, see Transit gateway route tables in Amazon VPC Transit Gateways.
-
Local gateway route table—A route table that's associated with an Outposts local gateway. For more information, see Local gateways in the AWS Outposts User Guide.
Subnet route tables
Your VPC has an implicit router, and you use route tables to control where network traffic is directed. Each subnet in your VPC must be associated with a route table, which controls the routing for the subnet (subnet route table). You can explicitly associate a subnet with a particular route table. Otherwise, the subnet is implicitly associated with the main route table. A subnet can only be associated with one route table at a time, but you can associate multiple subnets with the same subnet route table.
Routes
Each route in a table specifies a destination and a target. For example, to enable
your subnet to access the internet through an internet gateway, add the following
route to your subnet route table. The destination for the route is 0.0.0.0/0,
which represents all IPv4 addresses. The target is the internet gateway that's attached
to your VPC.
| Destination | Target |
|---|---|
| 0.0.0.0/0 | igw-id |
CIDR blocks for IPv4 and IPv6 are treated separately. For example, a route with a
destination CIDR of 0.0.0.0/0 does not automatically include all IPv6
addresses. You must create a route with a destination CIDR of ::/0 for
all IPv6 addresses.
If you frequently reference the same set of CIDR blocks across your AWS resources, you can create a customer-managed prefix list to group them together. You can then specify the prefix list as the destination in your route table entry.
Every route table contains a local route for communication within the VPC. This route is added by default to all route tables. If your VPC has more than one IPv4 CIDR block, your route tables contain a local route for each IPv4 CIDR block. If you've associated an IPv6 CIDR block with your VPC, your route tables contain a local route for the IPv6 CIDR block. You can replace or restore the target of each local route as needed.
Rules and considerations
-
You can add a route to your route tables that is more specific than the local route. The destination must match the entire IPv4 or IPv6 CIDR block of a subnet in your VPC. The target must be a NAT gateway, network interface, or Gateway Load Balancer endpoint.
-
If your route table has multiple routes, we use the most specific route that matches the traffic (longest prefix match) to determine how to route the traffic.
-
You can't add routes to IPv4 addresses that are an exact match or a subset of the following range: 169.254.168.0/22. This range is within the link-local address space and is reserved for use by AWS services. For example, Amazon EC2 uses addresses in this range for services that are accessible only from EC2 instances, such as the Instance Metadata Service (IMDS) and the Amazon DNS server. You can use a CIDR block that is larger than but overlaps 169.254.168.0/22, but packets destined for addresses in 169.254.168.0/22 will not be forwarded.
-
You can't add routes to IPv6 addresses that are an exact match or a subset of the following range: fd00:ec2::/32. This range is within the unique local address (ULA) space and is reserved for use by AWS services. For example, Amazon EC2 uses addresses in this range for services that are accessible only from EC2 instances, such as the Instance Metadata Service (IMDS) and the Amazon DNS server. You can use a CIDR block that is larger than but overlaps fd00:ec2::/32, but packets destined for addresses in fd00:ec2::/32 will not be forwarded.
-
You can add middlebox appliances to the routing paths for your VPC. For more information, see Routing for a middlebox appliance.
Example
In the following example, suppose that the VPC has both an IPv4 CIDR block and an IPv6 CIDR block. IPv4 and IPv6 traffic are treated separately, as shown in the following route table.
| Destination | Target |
|---|---|
| 10.0.0.0/16 | Local |
| 2001:db8:1234:1a00::/56 | Local |
| 172.31.0.0/16 | pcx-11223344556677889 |
| 0.0.0.0/0 | igw-12345678901234567 |
| ::/0 | eigw-aabbccddee1122334 |
-
IPv4 traffic to be routed within the VPC (10.0.0.0/16) is covered by the Local route.
-
IPv6 traffic to be routed within the VPC (2001:db8:1234:1a00::/56) is covered by the Local route.
-
The route for 172.31.0.0/16 sends traffic to a peering connection.
-
The route for all IPv4 traffic (0.0.0.0/0) sends traffic to an internet gateway. Therefore, all IPv4 traffic, except for traffic within the VPC and to the peering connection, is routed to the internet gateway.
-
The route for all IPv6 traffic (::/0) sends traffic to an egress-only internet gateway. Therefore, all IPv6 traffic, except for traffic within the VPC, is routed to the egress-only internet gateway.
Main route table
When you create a VPC, it automatically has a main route table. When a subnet does not have an explicit routing table associated with it, the main routing table is used by default. On the Route tables page in the Amazon VPC console, you can view the main route table for a VPC by looking for Yes in the Main column.
By default, when you create a nondefault VPC, the main route table contains only a local route. If you Create a VPC and choose a NAT gateway, Amazon VPC automatically adds routes to the main route table for the gateways.
The following rules apply to the main route table:
-
You can add, remove, and modify routes in the main route table.
-
You can't delete the main route table.
-
You can't set a gateway route table as the main route table.
-
You can replace the main route table by associating a custom route table with a subnet.
-
You can explicitly associate a subnet with the main route table, even if it's already implicitly associated.
You might want to do that if you change which table is the main route table. When you change which table is the main route table, it also changes the default for additional new subnets, or for any subnets that are not explicitly associated with any other route table. For more information, see Replace the main route table.
Custom route tables
By default, a route table contains a local route for communication within the VPC. If you Create a VPC and choose a public subnet, Amazon VPC creates a custom route table and adds a route that points to the internet gateway. One way to protect your VPC is to leave the main route table in its original default state. Then, explicitly associate each new subnet that you create with one of the custom route tables you've created. This ensures that you explicitly control how each subnet routes traffic.
You can add, remove, and modify routes in a custom route table. You can delete a custom route table only if it has no associations.
Subnet route table association
Each subnet in your VPC must be associated with a route table. A subnet can be explicitly associated with custom route table, or implicitly or explicitly associated with the main route table. For more information about viewing your subnet and route table associations, see Determine which subnets and or gateways are explicitly associated.
Subnets that are in VPCs associated with Outposts can have an additional target type of a local gateway. This is the only routing difference from non-Outposts subnets.
Example 1: Implicit and explicit subnet association
The following diagram shows the routing for a VPC with an internet gateway, a virtual private gateway, a public subnet, and a VPN-only subnet.
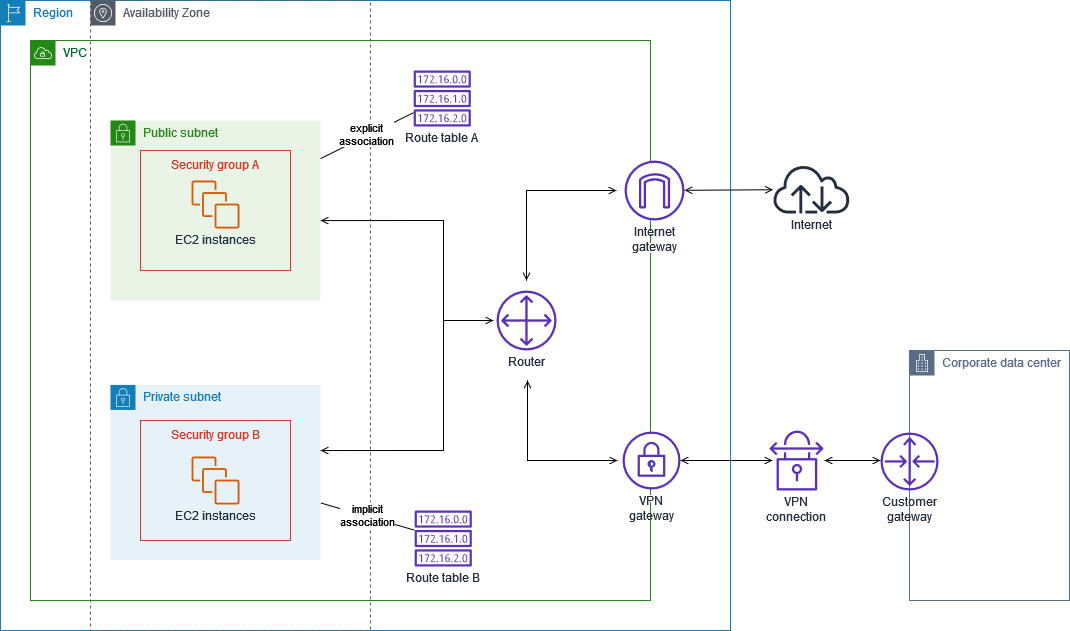
Route table A is a custom route table that is explicitly associated with the public subnet. It has a route that sends all traffic to the internet gateway, which is what makes the subnet a public subnet.
| Destination | Target |
|---|---|
VPC CIDR |
Local |
| 0.0.0.0/0 | igw-id |
Route table B is the main route table. It is implicitly associated with the private subnet. It has a route that sends all traffic to the virtual private gateway, but no route to the internet gateway, which is what makes the subnet a VPN-only subnet. If you create another subnet in this VPC and don't associate a custom route table, the subnet will also be implicitly associated with this route table because it is the main route table.
| Destination | Target |
|---|---|
VPC CIDR |
Local |
| 0.0.0.0/0 | vgw-id |
Example 2: Replacing the main route table
You might want to make changes to the main route table. To avoid any disruption to your traffic, we recommend that you first test the route changes using a custom route table. After you're satisfied with the testing, you can replace the main route table with the new custom table.
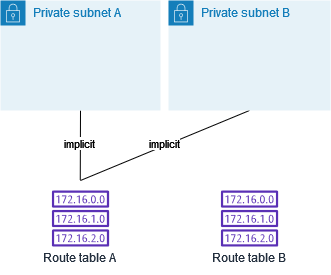
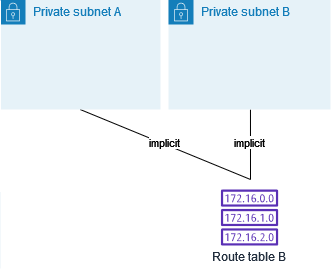
The following diagram shows two subnets and two route tables. Subnet A is implicitly associated with route table A, the main route table. Subnet B is implicitly associated with route table A. Route table B, a custom route table, isn't associated with either subnet.
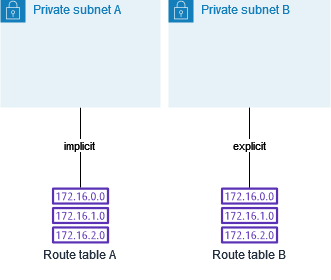
To replace the main route table, start by creating an explicit association between subnet B and route table B. Test route table B.
After you've tested route table B, make it the main route table. Subnet B still has an explicit association with route table B. However, subnet A now has an implicit association with route table B, because route table B is the new main route table. Route table A is no longer associated with either subnet.
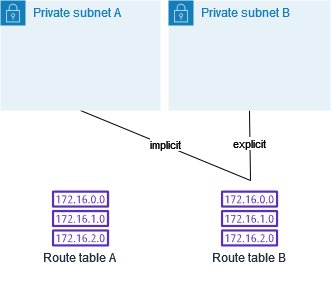
(Optional) If you disassociate subnet B from route table B, there is still an implicit association between subnet B and route table B. If you no longer need route table A, you can delete it.
Gateway route tables
You can associate a route table with an internet gateway or a virtual private gateway. When a route table is associated with a gateway, it's referred to as a gateway route table. You can create a gateway route table for fine-grain control over the routing path of traffic entering your VPC. For example, you can intercept the traffic that enters your VPC through an internet gateway by redirecting that traffic to a middlebox appliance (such as a security appliance) in your VPC.
Gateway route table routes
A gateway route table associated with an internet gateway supports routes with the following targets:
-
The default local route
-
A network interface for a middlebox appliance
A gateway route table associated with a virtual private gateway supports routes with the following targets:
-
The default local route
-
A network interface for a middlebox appliance
When the target is a Gateway Load Balancer endpoint or a network interface, the following destinations are allowed:
-
The entire IPv4 or IPv6 CIDR block of your VPC. In this case, you replace the target of the default local route.
-
The entire IPv4 or IPv6 CIDR block of a subnet in your VPC. This is a more specific route than the default local route.
If you change the target of the local route in a gateway route table to a network
interface in your VPC, you can later restore it to the default local
target. For more information, see Replace or restore the target for a local route.
Example
In the following gateway route table, traffic destined for a subnet with the
172.31.0.0/20 CIDR block is routed to a specific network interface.
Traffic destined for all other subnets in the VPC uses the local route.
| Destination | Target |
|---|---|
| 172.31.0.0/16 | Local |
| 172.31.0.0/20 | eni-id |
Example
In the following gateway route table, the target for the local route is replaced with a network interface ID. Traffic destined for all subnets within the VPC is routed to the network interface.
| Destination | Target |
|---|---|
| 172.31.0.0/16 | eni-id |
Rules and considerations
You cannot associate a route table with a gateway if any of the following applies:
-
The route table contains existing routes with targets other than a network interface, Gateway Load Balancer endpoint, or the default local route.
-
The route table contains existing routes to CIDR blocks outside of the ranges in your VPC.
-
Route propagation is enabled for the route table.
In addition, the following rules and considerations apply:
-
You cannot add routes to any CIDR blocks outside of the ranges in your VPC, including ranges larger than the individual VPC CIDR blocks.
-
You can only specify
local, a Gateway Load Balancer endpoint, or a network interface as a target. You cannot specify any other types of targets, including individual host IP addresses. For more information, see Example routing options. -
You cannot specify a prefix list as a destination.
-
You cannot use a gateway route table to control or intercept traffic outside of your VPC, for example, traffic through an attached transit gateway. You can intercept traffic that enters your VPC and redirect it to another target in the same VPC only.
-
To ensure that traffic reaches your middlebox appliance, the target network interface must be attached to a running instance. For traffic that flows through an internet gateway, the target network interface must also have a public IP address.
-
When configuring your middlebox appliance, take note of the appliance considerations.
-
When you route traffic through a middlebox appliance, the return traffic from the destination subnet must be routed through the same appliance. Asymmetric routing is not supported.
-
Route table rules apply to all traffic that leaves a subnet. Traffic that leaves a subnet is defined as traffic destined to that subnet's gateway router's MAC address. Traffic that is destined for the MAC address of another network interface in the subnet makes use of data link (layer 2) routing instead of network (layer 3) so the rules do not apply to this traffic.
-
Not all Local Zones support edge association with virtual private gateways. For more information on available zones, see Considerations in the AWS Local Zones User Guide.
Route priority
In general, we direct traffic using the most specific route that matches the traffic. This is known as the longest prefix match. If your route table has overlapping or matching routes, additional rules apply.
Longest prefix match
Routes to IPv4 and IPv6 addresses or CIDR blocks are independent of each other. We use the most specific route that matches either IPv4 traffic or IPv6 traffic to determine how to route the traffic.
The following example subnet route table has a route for IPv4 internet traffic
(0.0.0.0/0) that points to an internet gateway, and a route for
172.31.0.0/16 IPv4 traffic that points to a peering connection
(pcx-11223344556677889). Any traffic from the subnet that's
destined for the 172.31.0.0/16 IP address range uses the peering
connection, because this route is more specific than the route for internet gateway.
Any traffic destined for a target within the VPC (10.0.0.0/16) is
covered by the local route, and therefore is routed within the VPC. All
other traffic from the subnet uses the internet gateway.
| Destination | Target |
|---|---|
| 10.0.0.0/16 | local |
| 172.31.0.0/16 | pcx-11223344556677889 |
| 0.0.0.0/0 | igw-12345678901234567 |
Route priority and propagated routes
If you've attached a virtual private gateway to your VPC and enabled route propagation on your subnet route table, routes representing your Site-to-Site VPN connection automatically appear as propagated routes in your route table.
If the destination of a propagated route overlaps a static route, the static route takes priority.
If the destination of a propagated route is identical to the destination of a static route, the static route takes priority if the target is one of the following:
-
internet gateway
-
NAT gateway
-
Network interface
-
Instance ID
-
Gateway VPC endpoint
-
Transit gateway
-
VPC peering connection
-
Gateway Load Balancer endpoint
For more information, see Route tables and VPN route priority in the AWS Site-to-Site VPN User Guide.
The following example route table has a static route to an internet gateway and a
propagated route to a virtual private gateway. Both routes have a destination of
172.31.0.0/24. Because a static route to an internet gateway takes
priority, all traffic destined for 172.31.0.0/24 is routed to the
internet gateway.
| Destination | Target | Propagated |
|---|---|---|
| 10.0.0.0/16 | local | No |
| 172.31.0.0/24 | vgw-11223344556677889 | Yes |
| 172.31.0.0/24 | igw-12345678901234567 | No |
Route priority and prefix lists
If your route table references a prefix list, the following rules apply:
-
If your route table contains a static route with a destination CIDR block that overlaps a static route with a prefix list, the static route with the CIDR block takes priority.
-
If your route table contains a propagated route that matches a route that references a prefix list, the route that references the prefix list takes priority. Please note that for routes that overlap, more specific routes always take priority irrespective of whether they are propagated routes, static routes, or routes that reference prefix lists.
-
If your route table references multiple prefix lists that have overlapping CIDR blocks to different targets, we randomly choose which route takes priority. Thereafter, the same route always takes priority.
Route table quotas
There is a quota on the number of route tables that you can create per VPC. There is also a quota on the number of routes that you can add per route table. For more information, see Amazon VPC quotas.
Troubleshoot reachability issues
Reachability Analyzer is a static configuration analysis tool. Use Reachability Analyzer to analyze and debug network reachability between two resources in your VPC. Reachability Analyzer produces hop-by-hop details of the virtual path between these resources when they are reachable, and identifies the blocking component otherwise. For example, it can identify missing or misconfigured route table routes.
For more information, see the Reachability Analyzer Guide.
