HMAC-SHA Signature
Topics
Required Authentication Information
When accessing Amazon SimpleDB using one of the AWS SDKs, the SDK handles the authentication process for you. For a list of available AWS SDKs supporting Amazon SimpleDB, see Available Libraries.
However, when accessing Amazon SimpleDB using a REST request, you must provide the following items so the request can be authenticated.
Authentication
-
AWSAccessKeyId—Your AWS account is identified by your Access Key ID, which AWS uses to look up your Secret Access Key.
-
Signature—Each request must contain a valid HMAC-SHA signature, or the request is rejected.
A request signature is calculated using your Secret Access Key, which is a shared secret known only to you and AWS. You must use a HMAC-SHA256 signature.
-
Date—Each request must contain the time stamp of the request.
Depending on the API you're using, you can provide an expiration date and time for the request instead of or in addition to the time stamp. For details of what is required and allowed for each API, see the authentication topic for the particular API.
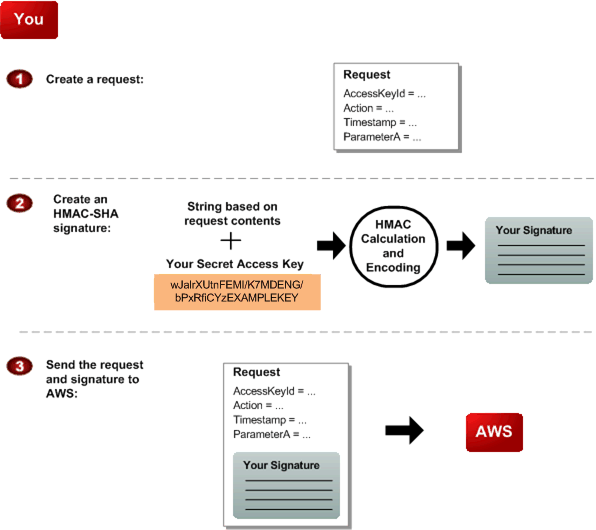
Authentication Process
Following is the series of tasks required to authenticate requests to AWS using an HMAC-SHA request signature. It is assumed you have already created an AWS account and received an Access Key ID and Secret Access Key. For more information about those, see Creating an AWS Account.
You perform the first three tasks.

|
You construct a request to AWS. |

|
You calculate a keyed-hash message authentication code (HMAC-SHA) signature using your Secret
Access Key (for information about HMAC, go to http://www.rfc-editor.org/rfc/rfc2104.txt |

|
You include the signature and your Access Key ID in the request, and then send the request to AWS. |
AWS performs the next three tasks.


|
AWS uses the Access Key ID to look up your Secret Access Key. |

|
AWS generates a signature from the request data and the Secret Access Key using the same algorithm you used to calculate the signature you sent in the request. |

|
If the signature generated by AWS matches the one you sent in the request, the request is considered authentic. If the comparison fails, the request is discarded, and AWS returns an error response. |
Signing REST Requests
You can send REST requests over either HTTP or HTTPS. Regardless of which protocol you use, you must include a signature in every REST request. This section describes how to create the signature. The method described in the following procedure is known as signature version 2, and uses the HMAC-SHA256 signing method.
In addition to the requirements listed in Required Authentication Information, signatures for REST requests must also include:
-
SignatureVersion—The AWS signature version, which is currently the value
2. -
SignatureMethod—Explicitly provide the signature method
HmacSHA256.
Important
If you are currently using signature version 1: Version 1 is deprecated, and you should move to signature version 2 immediately.
To create the signature
-
Create the canonicalized query string that you need later in this procedure:
Sort the UTF-8 query string components by parameter name with natural byte ordering.
The parameters can come from the GET URI or from the POST body (when
Content-Typeisapplication/x-www-form-urlencoded).URL encode the parameter name and values according to the following rules:
-
Do not URL encode any of the unreserved characters that RFC 3986 defines. These unreserved characters are A-Z, a-z, 0-9, hyphen ( - ), underscore ( _ ), period ( . ), and tilde ( ~ ).
-
Percent encode all other characters with %XY, where X and Y are hex characters 0-9 and uppercase A-F.
-
Percent encode extended UTF-8 characters in the form %XY%ZA....
-
Percent encode the space character as %20 (and not +, as common encoding schemes do).
Note
Currently all AWS service parameter names use unreserved characters, so you don't need to encode them. However, you might want to include code to handle parameter names that use reserved characters, for possible future use.
-
Separate the encoded parameter names from their encoded values with the equals sign ( = ) (ASCII character 61), even if the parameter value is empty.
Separate the name-value pairs with an ampersand ( & ) (ASCII character 38).
-
Create the string to sign according to the following pseudo-grammar (the
"\n"represents an ASCII newline character).StringToSign = HTTPVerb + "\n" + ValueOfHostHeaderInLowercase + "\n" + HTTPRequestURI + "\n" + CanonicalizedQueryString <from the preceding step>The HTTPRequestURI component is the HTTP absolute path component of the URI up to, but not including, the query string. If the HTTPRequestURI is empty, use a forward slash ( / ).
-
Calculate an RFC 2104-compliant HMAC with the string you just created, your Secret Access Key as the key, and SHA256 or SHA1 as the hash algorithm.
For more information, see http://www.ietf.org/rfc/rfc2104.txt
. -
Convert the resulting value to base64.
-
Use the resulting value as the value of the
Signaturerequest parameter.Important
The final signature you send in the request must be URL encoded as specified in RFC 3986 (for more information, see http://www.ietf.org/rfc/rfc3986.txt
). If your toolkit URL encodes your final request, then it handles the required URL encoding of the signature. If your toolkit doesn't URL encode the final request, then make sure to URL encode the signature before you include it in the request. Most importantly, make sure the signature is URL encoded only once. A common mistake is to URL encode it manually during signature formation, and then again when the toolkit URL encodes the entire request.
Some toolkits implement RFC 1738, which has different rules than RFC 3986 (for more information, go to
http://www.rfc-editor.org/rfc/rfc2104.txt
Example PutAttributes Request
https://sdb.amazonaws.com/?Action=PutAttributes
&DomainName=MyDomain
&ItemName=Item123
&Attribute.1.Name=Color&Attribute.1.Value=Blue
&Attribute.2.Name=Size&Attribute.2.Value=Med
&Attribute.3.Name=Price&Attribute.3.Value=0014.99
&Version=2009-04-15
&Timestamp=2010-01-25T15%3A01%3A28-07%3A00
&SignatureVersion=2
&SignatureMethod=HmacSHA256
&AWSAccessKeyId=<Your AWS Access Key ID>
Following is the string to sign.
GET\n
sdb.amazonaws.com\n
/\n
AWSAccessKeyId=<Your AWS Access Key ID>
&Action=PutAttributes
&Attribute.1.Name=Color
&Attribute.1.Value=Blue
&Attribute.2.Name=Size
&Attribute.2.Value=Med
&Attribute.3.Name=Price
&Attribute.3.Value=0014.99
&DomainName=MyDomain
&ItemName=Item123
&SignatureMethod=HmacSHA256
&SignatureVersion=2
&Timestamp=2010-01-25T15%3A01%3A28-07%3A00
&Version=2009-04-15
Following is the signed request.
https://sdb.amazonaws.com/?Action=PutAttributes
&DomainName=MyDomain
&ItemName=Item123
&Attribute.1.Name=Color&Attribute.1.Value=Blue
&Attribute.2.Name=Size&Attribute.2.Value=Med
&Attribute.3.Name=Price&Attribute.3.Value=0014.99
&Version=2009-04-15
&Timestamp=2010-01-25T15%3A01%3A28-07%3A00
&Signature=<URLEncode(Base64Encode(Signature))>
&SignatureVersion=2
&SignatureMethod=HmacSHA256
&AWSAccessKeyId=<Your AWS Access Key ID>
About the Time Stamp
The time stamp (or expiration time) you use in the request must be a dateTime
object, with the complete date plus hours, minutes, and seconds (for more information, go to
http://www.w3.org/TR/xmlschema-2/#dateTime
If you specify a time stamp (instead of an expiration time), the request automatically expires 15 minutes after the time stamp (in other words, AWS does not process a request if the request time stamp is more than 15 minutes earlier than the current time on AWS servers). Make sure your server's time is set correctly.
Important
If you are using .NET you must not send overly specific time stamps, due to different
interpretations of how extra time precision should be dropped. To avoid overly specific time
stamps, manually construct dateTime objects with no more than millisecond
precision.
