Tutorial: Configuring a static website on Amazon S3
Important
Amazon S3 now applies server-side encryption with Amazon S3 managed keys (SSE-S3) as the base level of encryption for every bucket in Amazon S3. Starting January 5, 2023, all new object uploads to Amazon S3 are automatically encrypted at no additional cost and with no impact on performance. The automatic encryption status for S3 bucket default encryption configuration and for new object uploads is available in AWS CloudTrail logs, S3 Inventory, S3 Storage Lens, the Amazon S3 console, and as an additional Amazon S3 API response header in the AWS Command Line Interface and AWS SDKs. For more information, see Default encryption FAQ.
You can configure an Amazon S3 bucket to function like a website. This example walks you through the steps of hosting a website on Amazon S3.
Important
The following tutorial requires disabling Block Public Access. We recommend keeping Block Public Access enabled. If you want to keep all four Block Public Access settings enabled and host a static website, you can use Amazon CloudFront origin access control (OAC). Amazon CloudFront provides the capabilities required to set up a secure static website. Amazon S3 static websites support only HTTP endpoints. Amazon CloudFront uses the durable storage of Amazon S3 while providing additional security headers, such as HTTPS. HTTPS adds security by encrypting a normal HTTP request and protecting against common cyberattacks. For more information, see Getting started with a secure static website in the Amazon CloudFront Developer Guide.
Topics
Step 1: Create a bucket
The following instructions provide an overview of how to create your buckets for website hosting. For detailed, step-by-step instructions on creating a bucket, see Creating a bucket.
To create a bucket
Sign in to the AWS Management Console and open the Amazon S3 console at https://console.aws.amazon.com/s3/
. -
Choose Create bucket.
-
Enter the Bucket name (for example,
example.com). -
Choose the Region where you want to create the bucket.
Choose a Region that is geographically close to you to minimize latency and costs, or to address regulatory requirements. The Region that you choose determines your Amazon S3 website endpoint. For more information, see Website endpoints.
-
To accept the default settings and create the bucket, choose Create.
Step 2: Enable static website hosting
After you create a bucket, you can enable static website hosting for your bucket. You can create a new bucket or use an existing bucket.
To enable static website hosting
-
Sign in to the AWS Management Console and open the Amazon S3 console at https://console.aws.amazon.com/s3/
. -
In the Buckets list, choose the name of the bucket that you want to enable static website hosting for.
-
Choose Properties.
-
Under Static website hosting, choose Edit.
-
Choose Use this bucket to host a website.
-
Under Static website hosting, choose Enable.
-
In Index document, enter the file name of the index document, typically
index.html.The index document name is case sensitive and must exactly match the file name of the HTML index document that you plan to upload to your S3 bucket. When you configure a bucket for website hosting, you must specify an index document. Amazon S3 returns this index document when requests are made to the root domain or any of the subfolders. For more information, see Configuring an index document.
-
To provide your own custom error document for 4XX class errors, in Error document, enter the custom error document file name.
The error document name is case sensitive and must exactly match the file name of the HTML error document that you plan to upload to your S3 bucket. If you don't specify a custom error document and an error occurs, Amazon S3 returns a default HTML error document. For more information, see Configuring a custom error document.
-
(Optional) If you want to specify advanced redirection rules, in Redirection rules, enter JSON to describe the rules.
For example, you can conditionally route requests according to specific object key names or prefixes in the request. For more information, see Configure redirection rules to use advanced conditional redirects.
-
Choose Save changes.
Amazon S3 enables static website hosting for your bucket. At the bottom of the page, under Static website hosting, you see the website endpoint for your bucket.
-
Under Static website hosting, note the Endpoint.
The Endpoint is the Amazon S3 website endpoint for your bucket. After you finish configuring your bucket as a static website, you can use this endpoint to test your website.
Step 3: Edit Block Public Access settings
By default, Amazon S3 blocks public access to your account and buckets. If you want to use a bucket to host a static website, you can use these steps to edit your block public access settings.
Warning
Before you complete this step, review Blocking public access to your Amazon S3 storage to ensure that you understand and accept the risks involved with allowing public access. When you turn off block public access settings to make your bucket public, anyone on the internet can access your bucket. We recommend that you block all public access to your buckets.
-
Open the Amazon S3 console at https://console.aws.amazon.com/s3/
. -
Choose the name of the bucket that you have configured as a static website.
-
Choose Permissions.
-
Under Block public access (bucket settings), choose Edit.
-
Clear Block all public access, and choose Save changes.
Warning
Before you complete this step, review Blocking public access to your Amazon S3 storage to ensure you understand and accept the risks involved with allowing public access. When you turn off block public access settings to make your bucket public, anyone on the internet can access your bucket. We recommend that you block all public access to your buckets.
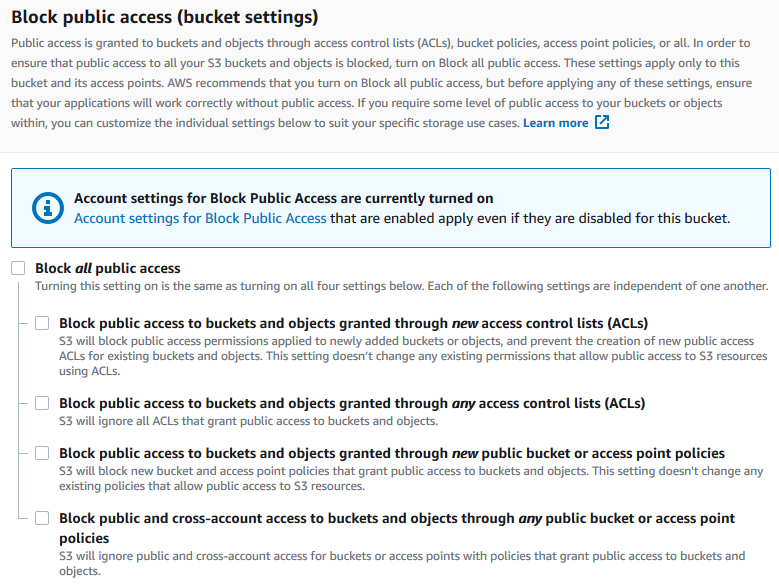
Amazon S3 turns off Block Public Access settings for your bucket. To create a public, static website, you might also have to edit the Block Public Access settings for your account before adding a bucket policy. If account settings for Block Public Access are currently turned on, you see a note under Block public access (bucket settings).
Step 4: Add a bucket policy that makes your bucket content publicly available
After you edit S3 Block Public Access settings, you can add a bucket policy to grant public read access to your bucket. When you grant public read access, anyone on the internet can access your bucket.
Important
The following policy is an example only and allows full access to the contents of your bucket. Before you proceed with this step, review How can I secure the files in my Amazon S3 bucket?
-
Under Buckets, choose the name of your bucket.
-
Choose Permissions.
-
Under Bucket Policy, choose Edit.
-
To grant public read access for your website, copy the following bucket policy, and paste it in the Bucket policy editor.
{ "Version": "2012-10-17", "Statement": [ { "Sid": "PublicReadGetObject", "Effect": "Allow", "Principal": "*", "Action": [ "s3:GetObject" ], "Resource": [ "arn:aws:s3:::Bucket-Name/*" ] } ] } -
Update the
Resourceto your bucket name.In the preceding example bucket policy,
Bucket-Nameis a placeholder for the bucket name. To use this bucket policy with your own bucket, you must update this name to match your bucket name. -
Choose Save changes.
A message appears indicating that the bucket policy has been successfully added.
If you see an error that says
Policy has invalid resource, confirm that the bucket name in the bucket policy matches your bucket name. For information about adding a bucket policy, see How do I add an S3 bucket policy?If you get an error message and cannot save the bucket policy, check your account and bucket Block Public Access settings to confirm that you allow public access to the bucket.
Step 5: Configure an index document
When you enable static website hosting for your bucket, you enter the name of the index document (for example, index.html). After you enable static website hosting for the bucket, you upload an HTML file with this index document name to your bucket.
To configure the index document
-
Create an
index.htmlfile.If you don't have an
index.htmlfile, you can use the following HTML to create one:<html xmlns="http://www.w3.org/1999/xhtml" > <head> <title>My Website Home Page</title> </head> <body> <h1>Welcome to my website</h1> <p>Now hosted on Amazon S3!</p> </body> </html> -
Save the index file locally.
The index document file name must exactly match the index document name that you enter in the Static website hosting dialog box. The index document name is case sensitive. For example, if you enter
index.htmlfor the Index document name in the Static website hosting dialog box, your index document file name must also beindex.htmland notIndex.html. Sign in to the AWS Management Console and open the Amazon S3 console at https://console.aws.amazon.com/s3/
. In the Buckets list, choose the name of the bucket that you want to use to host a static website.
-
Enable static website hosting for your bucket, and enter the exact name of your index document (for example,
index.html). For more information, see Enabling website hosting.After enabling static website hosting, proceed to step 6.
-
To upload the index document to your bucket, do one of the following:
Drag and drop the index file into the console bucket listing.
Choose Upload, and follow the prompts to choose and upload the index file.
For step-by-step instructions, see Uploading objects.
-
(Optional) Upload other website content to your bucket.
Step 6: Configure an error document
When you enable static website hosting for your bucket, you enter the name of the error document (for example, 404.html). After you enable static website hosting for the bucket, you upload an HTML file with this error document name to your bucket.
To configure an error document
-
Create an error document, for example
404.html. -
Save the error document file locally.
The error document name is case sensitive and must exactly match the name that you enter when you enable static website hosting. For example, if you enter
404.htmlfor the Error document name in the Static website hosting dialog box, your error document file name must also be404.html. Sign in to the AWS Management Console and open the Amazon S3 console at https://console.aws.amazon.com/s3/
. In the Buckets list, choose the name of the bucket that you want to use to host a static website.
-
Enable static website hosting for your bucket, and enter the exact name of your error document (for example,
404.html). For more information, see Enabling website hosting and Configuring a custom error document.After enabling static website hosting, proceed to step 6.
-
To upload the error document to your bucket, do one of the following:
Drag and drop the error document file into the console bucket listing.
Choose Upload, and follow the prompts to choose and upload the index file.
For step-by-step instructions, see Uploading objects.
Step 7: Test your website endpoint
After you configure static website hosting for your bucket, you can test your website endpoint.
Note
Amazon S3 does not support HTTPS access to the website. If you want to use HTTPS, you can use Amazon CloudFront to serve a static website hosted on Amazon S3.
For more information, see How do I use CloudFront to serve a static website hosted on Amazon S3?
-
Under Buckets, choose the name of your bucket.
-
Choose Properties.
-
At the bottom of the page, under Static website hosting, choose your Bucket website endpoint.
Your index document opens in a separate browser window.
You now have a website hosted on Amazon S3. This website is
available at the Amazon S3 website endpoint. However, you might have a domain, such as
example.com, that you want to use to serve the content from the
website you created. You might also want to use Amazon S3 root domain support to serve
requests for both http://www.example.com and
http://example.com. This requires additional steps. For an example,
see Tutorial: Configuring a static website using a
custom domain registered with Route 53.
Step 8: Clean up
If you created your static website only as a learning exercise, delete the AWS resources that you allocated so that you no longer accrue charges. After you delete your AWS resources, your website is no longer available. For more information, see Deleting a bucket.
