Controlling access with security groups
VPC security groups control the access that traffic has in and out of a DB instance. By default, network access is turned off for a DB instance. You can specify rules in a security group that allow access from an IP address range, port, or security group. After ingress rules are configured, the same rules apply to all DB instances that are associated with that security group. You can specify up to 20 rules in a security group.
Overview of VPC security groups
Each VPC security group rule makes it possible for a specific source to access a DB instance in a VPC that is associated with that VPC security group. The source can be a range of addresses (for example, 203.0.113.0/24), or another VPC security group. By specifying a VPC security group as the source, you allow incoming traffic from all instances (typically application servers) that use the source VPC security group. VPC security groups can have rules that govern both inbound and outbound traffic. However, the outbound traffic rules typically don't apply to DB instances. Outbound traffic rules apply only if the DB instance acts as a client. For example, outbound traffic rules apply to an Oracle DB instance with outbound database links. You must use the Amazon EC2 API or the Security Group option on the VPC console to create VPC security groups.
When you create rules for your VPC security group that allow access to the instances in your VPC, you must specify a port for each range of addresses that the rule allows access for. For example, if you want to turn on Secure Shell (SSH) access for instances in the VPC, create a rule allowing access to TCP port 22 for the specified range of addresses.
You can configure multiple VPC security groups that allow access to different ports for different instances in your VPC. For example, you can create a VPC security group that allows access to TCP port 80 for web servers in your VPC. You can then create another VPC security group that allows access to TCP port 3306 for RDS for MySQL DB instances in your VPC.
For more information on VPC security groups, see Security groups in the Amazon Virtual Private Cloud User Guide.
Note
If your DB instance is in a VPC but isn't publicly accessible, you can also use an AWS Site-to-Site VPN connection or an AWS Direct Connect connection to access it from a private network. For more information, see Internetwork traffic privacy.
Security group scenario
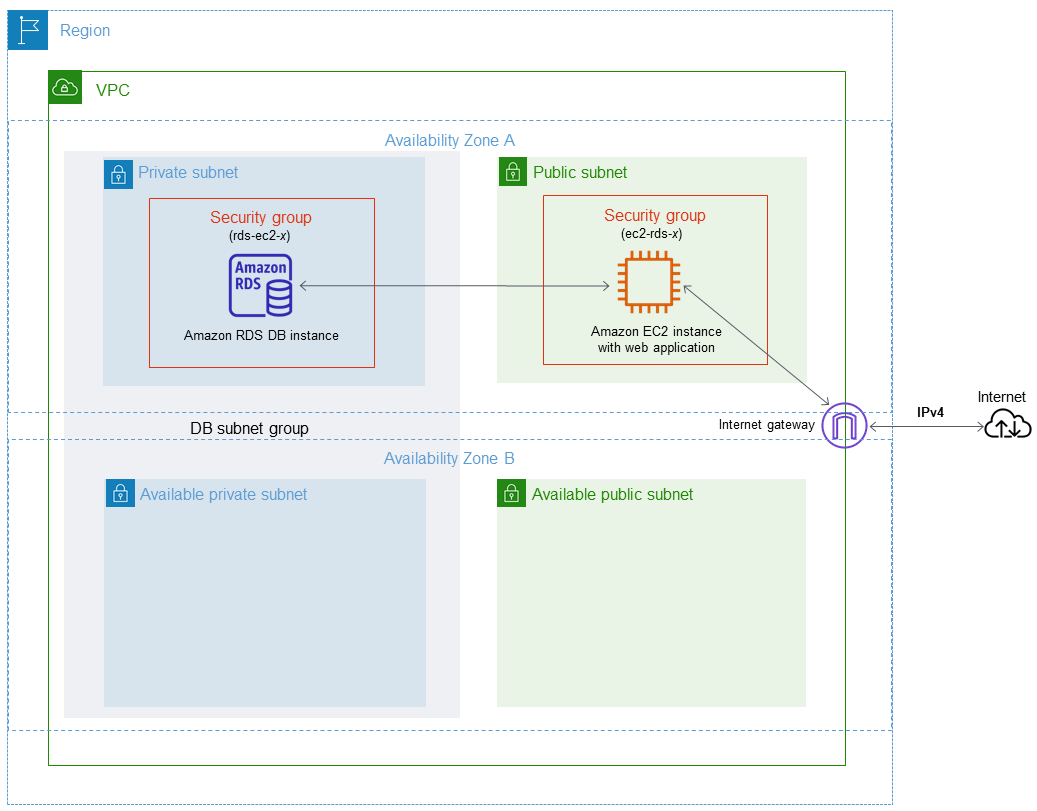
A common use of a DB instance in a VPC is to share data with an application server running in an Amazon EC2 instance in the same VPC, which is accessed by a client application outside the VPC. For this scenario, you use the RDS and VPC pages on the AWS Management Console or the RDS and EC2 API operations to create the necessary instances and security groups:
Create a VPC security group (for example,
sg-0123ec2example) and define inbound rules that use the IP addresses of the client application as the source. This security group allows your client application to connect to EC2 instances in a VPC that uses this security group.Create an EC2 instance for the application and add the EC2 instance to the VPC security group (
sg-0123ec2example) that you created in the previous step.Create a second VPC security group (for example,
sg-6789rdsexample) and create a new rule by specifying the VPC security group that you created in step 1 (sg-0123ec2example) as the source.Create a new DB instance and add the DB instance to the VPC security group (
sg-6789rdsexample) that you created in the previous step. When you create the DB instance, use the same port number as the one specified for the VPC security group (sg-6789rdsexample) rule that you created in step 3.
The following diagram shows this scenario.
For detailed instructions about configuring a VPC for this scenario, see Tutorial: Create a VPC for use with a DB instance (IPv4 only). For more information about using a VPC, see Amazon VPC VPCs and Amazon RDS.
Creating a VPC security group
You can create a VPC security group for a DB instance by using the VPC console. For information about creating a security group, see Provide access to your DB instance in your VPC by creating a security group and Security groups in the Amazon Virtual Private Cloud User Guide.
Associating a security group with a DB instance
You can associate a security group with a DB instance by using
Modify on the RDS console, the
ModifyDBInstance Amazon RDS API, or the modify-db-instance
AWS CLI command.
The following CLI example associates a specific VPC security group and removes DB security groups from the DB instance
aws rds modify-db-instance --db-instance-identifierdbName--vpc-security-group-idssg-ID
For information about modifying a DB instance, see Modifying an Amazon RDS DB instance. For security group considerations when you restore a DB instance from a DB snapshot, see Security group considerations.
Note
The RDS console displays different security group rule names for your database if the Port value is configured to a non-default value.
For RDS for Oracle DB instances, additional security groups can be associated by populating the security group options setting for the Oracle Enterprise Manager Database Express (OEM), Oracle Management Agent for Enterprise Manager Cloud Control (OEM Agent) and the Oracle Secure Sockets Layer options. In this case, both security groups associated with the DB instance and options settings apply to the DB instance. For more information about these option groups, see Oracle Enterprise Manager, Oracle Management Agent for Enterprise Manager Cloud Control, and Oracle Secure Sockets Layer.
