Configure a Windows instance using the EC2Config service (legacy)
Note
Microsoft no longer supports the Windows Server 2012 operating system. EC2Config documentation is provided for historical references only. We strongly recommend that you upgrade to the latest launch service for a supported operating system such as Windows Server 2022.
The latest launch service for Windows Server 2022 is EC2Launch v2, which replaces both EC2Config and EC2Launch.
Windows AMIs for Windows Server 2012 R2 and earlier include an optional service, the EC2Config
service (EC2Config.exe). EC2Config starts when the instance boots and
performs tasks during startup and each time you stop or start the instance. EC2Config can
also perform tasks on demand. Some of these tasks are automatically enabled, while others
must be enabled manually. Although optional, this service provides access to advanced
features that aren't otherwise available. This service runs in the LocalSystem
account.
Note
EC2Launch replaced EC2Config on Windows AMIs for Windows Server 2016 and 2019. For more information, see Configure a Windows instance using EC2Launch. The latest launch service for all supported Windows Server versions is EC2Launch v2, which replaces both EC2Config and EC2Launch.
EC2Config uses settings files to control its operation. You can update these settings
files using either a graphical tool or by directly editing XML files. The service binaries
and additional files are contained in the
%ProgramFiles%\Amazon\EC2ConfigService directory.
Contents
- EC2Config tasks
- Install the latest version of EC2Config
- Stop, restart, delete, or uninstall EC2Config
- EC2Config and AWS Systems Manager
- EC2Config and Sysprep
- EC2 service properties
- EC2Config settings files
- Configure proxy settings for the EC2Config service
- EC2Config version history
- Troubleshoot issues with the EC2Config service
EC2Config tasks
EC2Config runs initial startup tasks when the instance is first started and then disables them. To run these tasks again, you must explicitly enable them prior to shutting down the instance, or by running Sysprep manually. These tasks are as follows:
-
Set a random, encrypted password for the administrator account.
-
Generate and install the host certificate used for Remote Desktop Connection.
-
Dynamically extend the operating system partition to include any unpartitioned space.
-
Execute the specified user data (and Cloud-Init, if it's installed). For more information about specifying user data, see Work with instance user data.
EC2Config performs the following tasks every time the instance starts:
-
Change the host name to match the private IP address in Hex notation (this task is disabled by default and must be enabled in order to run at instance start).
-
Configure the key management server (AWS KMS), check for Windows activation status, and activate Windows as necessary.
-
Mount all Amazon EBS volumes and instance store volumes, and map volume names to drive letters.
-
Write event log entries to the console to help with troubleshooting (this task is disabled by default and must be enabled in order to run at instance start).
-
Write to the console that Windows is ready.
-
Add a custom route to the primary network adapter to enable the following IP addresses when a single NIC or multiple NICs are attached:
169.254.169.250,169.254.169.251, and169.254.169.254. These addresses are used by Windows Activation and when you access instance metadata.Note
If the Windows OS is configured to use IPv4, these IPv4 link-local addresses can be used. If the Windows OS has the IPv4 network protocol stack disabled and uses IPv6 instead, add
[fd00:ec2::240]in place of169.254.169.250and169.254.169.251. Then add[fd00:ec2::254]in place of169.254.169.254.
EC2Config performs the following task every time a user logs in:
-
Display wallpaper information to the desktop background.
While the instance is running, you can request that EC2Config perform the following task on demand:
-
Run Sysprep and shut down the instance so that you can create an AMI from it. For more information, see Create a standardized Amazon Machine Image (AMI) using Sysprep.
Stop, restart, delete, or uninstall EC2Config
You can manage the EC2Config service just as you would any other service.
To apply updated settings to your instance, you can stop and restart the service. If you're manually installing EC2Config, you must stop the service first.
To stop the EC2Config service
-
Launch and connect to your Windows instance.
-
On the Start menu, point to Administrative Tools, and then click Services.
-
In the list of services, right-click EC2Config, and select Stop.
To restart the EC2Config service
-
Launch and connect to your Windows instance.
-
On the Start menu, point to Administrative Tools, and then click Services.
-
In the list of services, right-click EC2Config, and select Restart.
If you don't need to update the configuration settings, create your own AMI, or use AWS Systems Manager, you can delete and uninstall the service. Deleting a service removes its registry subkey. Uninstalling a service removes the files, the registry subkey, and any shortcuts to the service.
To delete the EC2Config service
-
Start a command prompt window.
-
Run the following command:
sc delete ec2config
To uninstall EC2Config
-
Launch and connect to your Windows instance.
-
On the Start menu, click Control Panel.
-
Double-click Programs and Features.
-
On the list of programs, select EC2ConfigService, and click Uninstall .
EC2Config and AWS Systems Manager
The EC2Config service processes Systems Manager requests on instances created from AMIs for versions of Windows Server prior to Windows Server 2016 that were published before November 2016.
Instances created from AMIs for versions of Windows Server prior to Windows Server 2016 that were published after November 2016 include the EC2Config service and SSM Agent. EC2Config performs all of the tasks described earlier, and SSM Agent processes requests for Systems Manager capabilities like Run Command and State Manager.
You can use Run Command to upgrade your existing instances to use to the latest version of the EC2Config service and SSM Agent. For more information, see Update SSM Agent by using Run Command in the AWS Systems Manager User Guide.
EC2Config and Sysprep
The EC2Config service runs Sysprep, a Microsoft tool that enables you to create a customized
Windows AMI that can be reused. When EC2Config calls Sysprep, it uses the files in
%ProgramFiles%\Amazon\EC2ConfigService\Settings to determine
which operations to perform. You can edit these files indirectly using the EC2
Service Properties dialog box, or directly using an XML editor or a text
editor. However, there are some advanced settings that aren't available in the
Ec2 Service Properties dialog box, so you must edit those
entries directly.
If you create an AMI from an instance after updating its settings, the new settings are applied to any instance that's launched from the new AMI. For information about creating an AMI, see Create a custom Windows AMI.
EC2 service properties
The following procedure describes how to use the Ec2 Service Properties dialog box to enable or disable settings.
To change settings using the Ec2 Service Properties dialog box
-
Launch and connect to your Windows instance.
-
From the Start menu, click All Programs, and then click EC2ConfigService Settings.
-
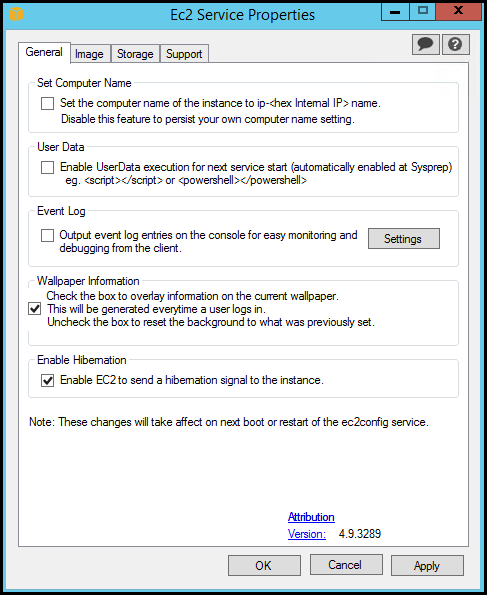
On the General tab of the EC2 Service Properties dialog box, you can enable or disable the following settings.
- Set Computer Name
-
If this setting is enabled (it is disabled by default), the host name is compared to the current internal IP address at each boot; if the host name and internal IP address do not match, the host name is reset to contain the internal IP address and then the system reboots to pick up the new host name. To set your own host name, or to prevent your existing host name from being modified, do not enable this setting.
- User Data
-
User data execution enables you to specify scripts in the instance metadata. By default, these scripts are run during the initial launch. You can also configure them to run the next time you reboot or start the instance, or every time you reboot or start the instance.
If you have a large script, we recommend that you use user data to download the script, and then run it.
For more information, see User data execution.
- Event Log
-
Use this setting to display event log entries on the console during boot for easy monitoring and debugging.
Click Settings to specify filters for the log entries sent to the console. The default filter sends the three most recent error entries from the system event log to the console.
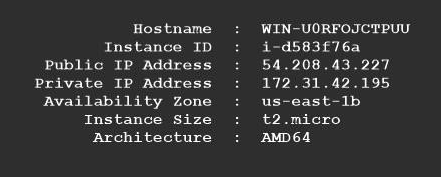
- Wallpaper Information
-
Use this setting to display system information on the desktop background. The following is an example of the information displayed on the desktop background.
The information displayed on the desktop background is controlled by the settings file
EC2ConfigService\Settings\WallpaperSettings.xml. - Enable Hibernation
-
Use this setting to allow EC2 to signal the operating system to perform hibernation.
-
Click the Storage tab. You can enable or disable the following settings.
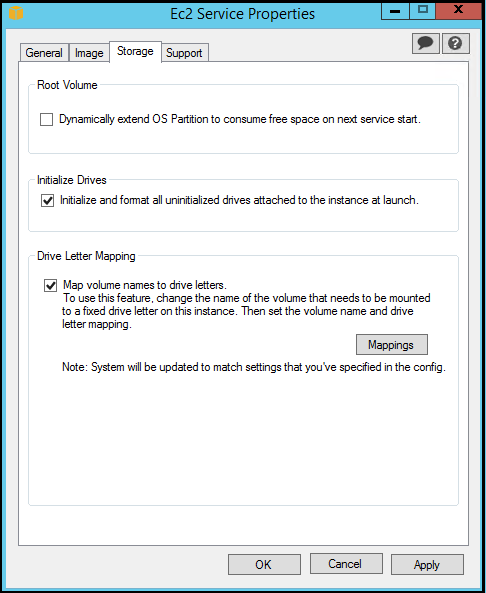
- Root Volume
-
This setting dynamically extends Disk 0/Volume 0 to include any unpartitioned space. This can be useful when the instance is booted from a root device volume that has a custom size.
- Initialize Drives
-
This setting formats and mounts all volumes attached to the instance during start.
- Drive Letter Mapping
-
The system maps the volumes attached to an instance to drive letters. For Amazon EBS volumes, the default is to assign drive letters going from D: to Z:. For instance store volumes, the default depends on the driver. AWS PV drivers and Citrix PV drivers assign instance store volumes drive letters going from Z: to A:. Red Hat drivers assign instance store volumes drive letters going from D: to Z:.
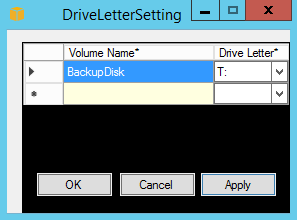
To choose the drive letters for your volumes, click Mappings. In the DriveLetterSetting dialog box, specify the Volume Name and Drive Letter values for each volume, click Apply, and then click OK. We recommend that you select drive letters that avoid conflicts with drive letters that are likely to be in use, such as drive letters in the middle of the alphabet.
After you specify a drive letter mapping and attach a volume with same label as one of the volume names that you specified, EC2Config automatically assigns your specified drive letter to that volume. However, the drive letter mapping fails if the drive letter is already in use. Note that EC2Config doesn't change the drive letters of volumes that were already mounted when you specified the drive letter mapping.
-
To save your settings and continue working on them later, click OK to close the EC2 Service Properties dialog box. If you have finished customizing your instance and want to create an AMI from that instance, see Create a standardized Amazon Machine Image (AMI) using Sysprep.
EC2Config settings files
The settings files control the operation of the EC2Config service. These files are
located in the C:\Program Files\Amazon\Ec2ConfigService\Settings
directory:
-
ActivationSettings.xml—Controls product activation using a key management server (AWS KMS). -
AWS.EC2.Windows.CloudWatch.json—Controls which performance counters to send to CloudWatch and which logs to send to CloudWatch Logs. -
BundleConfig.xml—Controls how EC2Config prepares an instance store-backed instance for AMI creation. -
Config.xml—Controls the primary settings. -
DriveLetterConfig.xml—Controls drive letter mappings. -
EventLogConfig.xml—Controls the event log information that's displayed on the console while the instance is booting. -
WallpaperSettings.xml—Controls the information that's displayed on the desktop background.
ActivationSettings.xml
This file contains settings that control product activation. When Windows boots, the EC2Config service checks whether Windows is already activated. If Windows is not already activated, it attempts to activate Windows by searching for the specified AWS KMS server.
-
SetAutodiscover—Indicates whether to detect a AWS KMS automatically. -
TargetKMSServer—Stores the private IP address of a AWS KMS. The AWS KMS must be in the same Region as your instance. -
DiscoverFromZone—Discovers the AWS KMS server from the specified DNS zone. -
ReadFromUserData—Gets the AWS KMS server from UserData. -
LegacySearchZones—Discovers the AWS KMS server from the specified DNS zone. -
DoActivate—Attempts activation using the specified settings in the section. This value can betrueorfalse. -
LogResultToConsole—Displays the result to the console.
BundleConfig.xml
This file contains settings that control how EC2Config prepares an instance for AMI creation.
-
AutoSysprep—Indicates whether to use Sysprep automatically. Change the value toYesto use Sysprep. -
SetRDPCertificate—Sets a self-signed certificate to the Remote Desktop server. This enables you to securely RDP into the instances. Change the value toYesif the new instances should have the certificate.This setting is not used with Windows Server 2012 instances because they can generate their own certificates.
-
SetPasswordAfterSysprep—Sets a random password on a newly launched instance, encrypts it with the user launch key, and outputs the encrypted password to the console. Change the value of this setting toNoif the new instances should not be set to a random encrypted password.
Config.xml
Plug-ins
-
Ec2SetPassword—Generates a random encrypted password each time you launch an instance. This feature is disabled by default after the first launch so that reboots of this instance don't change a password set by the user. Change this setting toEnabledto continue to generate passwords each time you launch an instance.This setting is important if you are planning to create an AMI from your instance.
-
Ec2SetComputerName—Sets the host name of the instance to a unique name based on the IP address of the instance and reboots the instance. To set your own host name, or prevent your existing host name from being modified, you must disable this setting. -
Ec2InitializeDrives—Initializes and formats all volumes during startup. This feature is enabled by default. -
Ec2EventLog—Displays event log entries in the console. By default, the three most recent error entries from the system event log are displayed. To specify the event log entries to display, edit theEventLogConfig.xmlfile located in theEC2ConfigService\Settingsdirectory. For information about the settings in this file, see Eventlog Keyin the MSDN Library. -
Ec2ConfigureRDP—Sets up a self-signed certificate on the instance, so users can securely access the instance using Remote Desktop. This feature is disabled on Windows Server 2008 and Windows Server 2012 instances because they can generate their own certificates. -
Ec2OutputRDPCert—Displays the Remote Desktop certificate information to the console so that the user can verify it against the thumbprint. -
Ec2SetDriveLetter—Sets the drive letters of the mounted volumes based on user-defined settings. By default, when an Amazon EBS volume is attached to an instance, it can be mounted using the drive letter on the instance. To specify your drive letter mappings, edit theDriveLetterConfig.xmlfile located in theEC2ConfigService\Settingsdirectory. -
Ec2WindowsActivate—The plug-in handles Windows activation. It checks to see if Windows is activated. If not, it updates the AWS KMS client settings, and then activates Windows.To modify the AWS KMS settings, edit the
ActivationSettings.xmlfile located in theEC2ConfigService\Settingsdirectory. -
Ec2DynamicBootVolumeSize—Extends Disk 0/Volume 0 to include any unpartitioned space. -
Ec2HandleUserData—Creates and runs scripts created by the user on the first launch of an instance after Sysprep is run. Commands wrapped in script tags are saved to a batch file, and commands wrapped in PowerShell tags are saved to a .ps1 file (corresponds to the User Data check box on the Ec2 Service Properties dialog box). -
Ec2ElasticGpuSetup—Installs the Elastic GPU software package if the instance is associated with an elastic GPU. -
Ec2FeatureLogging—Sends Windows feature installation and corresponding service status to the console. Supported only for the Microsoft Hyper-V feature and corresponding vmms service.
Global Settings
-
ManageShutdown—Ensures that instances launched from instance store-backed AMIs do not terminate while running Sysprep. -
SetDnsSuffixList—Sets the DNS suffix of the network adapter for Amazon EC2. This allows DNS resolution of servers running in Amazon EC2 without providing the fully qualified domain name.Note
This adds a DNS suffix lookup for the following domain and configures other standard suffixes. For more information about how launch agents set DNS suffixes, see Configure DNS Suffix.
region.ec2-utilities.amazonaws.com -
WaitForMetaDataAvailable—Ensures that the EC2Config service will wait for metadata to be accessible and the network available before continuing with the boot. This check ensures that EC2Config can obtain information from metadata for activation and other plug-ins. -
ShouldAddRoutes—Adds a custom route to the primary network adapter to enable the following IP addresses when multiple NICs are attached: 169.254.169.250, 169.254.169.251, and 169.254.169.254. These addresses are used by Windows Activation and when you access instance metadata. -
RemoveCredentialsfromSyspreponStartup—Removes the administrator password fromSysprep.xmlthe next time the service starts. To ensure that this password persists, edit this setting.
DriveLetterConfig.xml
This file contains settings that control drive letter mappings. By default, a volume can be mapped to any available drive letter. You can mount a volume to a particular drive letter as follows.
<?xml version="1.0" standalone="yes"?>
<DriveLetterMapping>
  <Mapping>
    <VolumeName></VolumeName>
    <DriveLetter></DriveLetter>
  </Mapping>
  . . .
  <Mapping>
    <VolumeName></VolumeName>
    <DriveLetter></DriveLetter>
  </Mapping>
</DriveLetterMapping>-
VolumeName—The volume label. For example,My VolumeTemporary Storage X, whereXis a number from 0 to 25. -
DriveLetter—The drive letter. For example,M:
EventLogConfig.xml
This file contains settings that control the event log information that's displayed on the console while the instance is booting. By default, we display the three most recent error entries from the System event log.
-
Category—The event log key to monitor. -
ErrorType—The event type (for example,Error,Warning,Information.) -
NumEntries—The number of events stored for this category. -
LastMessageTime—To prevent the same message from being pushed repeatedly, the service updates this value every time it pushes a message. -
AppName—The event source or application that logged the event.
WallpaperSettings.xml
This file contains settings that control the information that's displayed on the desktop background. The following information is displayed by default.
-
Hostname—Displays the computer name. -
Instance ID—Displays the ID of the instance. -
Public IP Address—Displays the public IP address of the instance. -
Private IP Address—Displays the private IP address of the instance. -
Availability Zone—Displays the Availability Zone in which the instance is running. -
Instance Size—Displays the type of instance. -
Architecture—Displays the setting of thePROCESSOR_ARCHITECTUREenvironment variable.
You can remove any of the information that's displayed by default by deleting its entry. You can add additional instance metadata to display as follows.
<WallpaperInformation>
  <name>display_name</name>
  <source>metadata</source>
  <identifier>meta-data/path</identifier>
</WallpaperInformation>
You can add additional System environment variables to display as follows.
<WallpaperInformation>
  <name>display_name</name>
  <source>EnvironmentVariable</source>
  <identifier>variable-name</identifier>
</WallpaperInformation>
InitializeDrivesSettings.xml
This file contains settings that control how EC2Config initializes drives.
By default, EC2Config initialize drives that were not brought online with the operating system. You can customize the plugin as follows.
<InitializeDrivesSettings>
    <SettingsGroup>setting</SettingsGroup>
</InitializeDrivesSettings>
Use a settings group to specify how you want to initialize drives:
- FormatWithTRIM
-
Enables the TRIM command when formatting drives. After a drive has been formatted and initialized, the system restores TRIM configuration.
Starting with EC2Config version 3.18, the TRIM command is disabled during the disk format operation by default. This improves formatting times. Use this setting to enable TRIM during the disk format operation for EC2Config version 3.18 and later.
- FormatWithoutTRIM
-
Disables the TRIM command when formatting drives and improves formatting times in Windows. After a drive has been formatted and initialized, the system restores TRIM configuration.
- DisableInitializeDrives
-
Disables formatting for new drives. Use this setting to initialize drives manually.
Configure proxy settings for the EC2Config service
You can configure the EC2Config service to communicate through a proxy using one of
the following methods: the AWS SDK for .NET, the system.net element, or
Microsoft Group Policy and Internet Explorer. Using the AWS SDK for .NET is the
preferred method because you can specify sign-in credentials.
Methods
Configure proxy settings using the AWS SDK for .NET (Preferred)
You can configure proxy settings for the EC2Config service by specifying the
proxy element in the Ec2Config.exe.config
file. For more information, see Configuration Files Reference for AWS SDK for .NET.
To specify the proxy element in Ec2Config.exe.config
-
Edit the
Ec2Config.exe.configfile on an instance where you want the EC2Config service to communicate through a proxy. By default, the file is located in the following directory:%ProgramFiles%\Amazon\Ec2ConfigService. -
Add the following
awselement to theconfigSections. Do not add this to any existingsectionGroups.For EC2Config versions 3.17 or earlier
<configSections>
   <section name="aws" type="Amazon.AWSSection, AWSSDK"/>
</configSections>
For EC2Config versions 3.18 or later
<configSections> <section name="aws" type="Amazon.AWSSection, AWSSDK.Core"/> </configSections> -
Add the following
awselement to theEc2Config.exe.configfile.<aws> <proxy host="string value" port="string value" username="string value" password="string value" /> </aws> -
Save your changes.
Configure proxy settings using the system.net element
You can specify proxy settings in a system.net element in the
Ec2Config.exe.config file. For more information, see defaultProxy
Element (Network Settings)
To specify the system.net element in Ec2Config.exe.config
-
Edit the
Ec2Config.exe.configfile on an instance where you want the EC2Config service to communicate through a proxy. By default, the file is located in the following directory:%ProgramFiles%\Amazon\Ec2ConfigService. -
Add a
defaultProxyentry tosystem.net. For more information, see defaultProxy Element (Network Settings)on MSDN. For example, the following configuration routes all traffic to use the proxy that is currently configured for Internet Explorer, with the exception of the metadata and licensing traffic, which will bypass the proxy.
<defaultProxy> <proxy usesystemdefault="true" /> <bypasslist> <add address="169.254.169.250" /> <add address="169.254.169.251" /> <add address="169.254.169.254" /> <add address="[fd00:ec2::250]" /> <add address="[fd00:ec2::254]" /> </bypasslist> </defaultProxy> -
Save your changes.
Configure proxy settings using Microsoft Group Policy and Microsoft Internet Explorer
The EC2Config service runs under the Local System user account. You can specify instance-wide proxy settings for this account in Internet Explorer after you change Group Policy settings on the instance.
To configure proxy settings using Group Policy and Internet Explorer
-
On an instance where you want the EC2Config service to communicate through a proxy, open a Command prompt as an Administrator, type
gpedit.msc, and press Enter. -
In the Local Group Policy Editor, under Local Computer Policy, choose Computer Configuration, Administrative Templates, Windows Components, Internet Explorer.
-
In the right-pane, choose Make proxy settings per-machine (rather than per-user) and then choose Edit policy setting.
-
Choose Enabled, and then choose Apply.
-
Open Internet Explorer, and then choose the Tools button.
-
Choose Internet Option, and then choose the Connections tab.
-
Choose LAN settings.
-
Under Proxy server, choose the Use a proxy server for your LAN option.
-
Specify address and port information and then choose OK.
