Amazon EC2 security groups for Linux instances
A security group acts as a virtual firewall for your EC2 instances to control incoming and outgoing traffic. Inbound rules control the incoming traffic to your instance, and outbound rules control the outgoing traffic from your instance. When you launch an instance, you can specify one or more security groups. If you don't specify a security group, Amazon EC2 uses the default security group for the VPC. You can add rules to each security group that allow traffic to or from its associated instances. You can modify the rules for a security group at any time. New and modified rules are automatically applied to all instances that are associated with the security group. When Amazon EC2 decides whether to allow traffic to reach an instance, it evaluates all of the rules from all of the security groups that are associated with the instance.
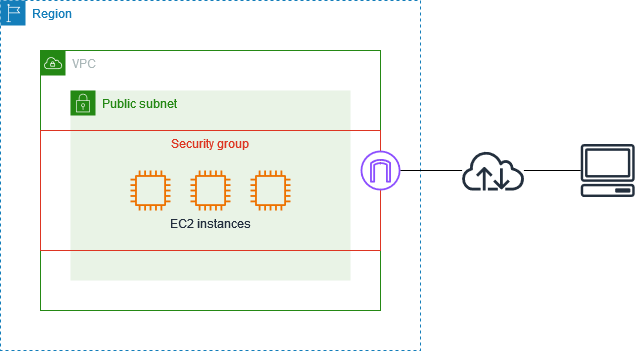
The following diagram shows a VPC with a subnet, an internet gateway, and a security group. The subnet contains EC2 instances. The security group is assigned to the instances. The only traffic that reaches the instance is the traffic allowed by the security group rules. For example, if the security group contains a rule that allows SSH traffic from your network, then you can connect to your instance from your computer using SSH. If the security group contains a rule that allows all traffic from the resources assigned to it, then each instance can receive any traffic sent from the other instances.
After you launch an instance, you can change its security groups. Security groups are associated with network interfaces. Changing an instance's security groups changes the security groups associated with the primary network interface (eth0). For more information, see Change an instance's security group. You can also change the security groups associated with any other network interface. For more information, see Modify network interface attributes.
Security is a shared responsibility between AWS and you. For more information, see Security in Amazon EC2. AWS provides security groups as one of the tools for securing your instances, and you need to configure them to meet your security needs. If you have requirements that aren't fully met by security groups, you can maintain your own firewall on any of your instances in addition to using security groups.
To allow traffic to a Windows instance, see Amazon EC2 security groups for Windows instances in the Amazon EC2 User Guide for Windows Instances.
There is no additional charge for using security groups.
Contents
