Amazon Machine Images (AMI)
An Amazon Machine Image (AMI) is a supported and maintained image provided by AWS that provides the information required to launch an instance. You must specify an AMI when you launch an instance. You can launch multiple instances from a single AMI when you require multiple instances with the same configuration. You can use different AMIs to launch instances when you require instances with different configurations.
An AMI includes the following:
-
One or more Amazon Elastic Block Store (Amazon EBS) snapshots, or, for instance-store-backed AMIs, a template for the root volume of the instance (for example, an operating system, an application server, and applications).
-
Launch permissions that control which AWS accounts can use the AMI to launch instances.
-
A block device mapping that specifies the volumes to attach to the instance when it's launched.
Amazon Machine Image (AMI) topics
- Use an AMI
- Create your own AMI
- Buy, share, and sell AMIs
- Deregister your AMI
- AL2023 and Amazon Linux 2
- AMI types
- Linux AMI virtualization types
- Boot modes
- Find a Linux AMI
- Shared AMIs
- Paid AMIs
- AMI lifecycle
- Use encryption with EBS-backed AMIs
- Monitor AMI events using Amazon EventBridge
- Understand AMI billing information
- Amazon Linux
- User provided kernels
- Configure the Amazon Linux 2 MATE desktop connection
- AMI quotas
Use an AMI
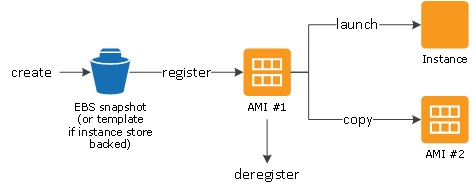
The following diagram summarizes the AMI lifecycle. After you create and register an AMI, you can use it to launch new instances. (You can also launch instances from an AMI if the AMI owner grants you launch permissions.) You can copy an AMI within the same AWS Region or to different AWS Regions. When you no longer require an AMI, you can deregister it.
You can search for an AMI that meets the criteria for your instance. You can search for AMIs provided by AWS or AMIs provided by the community. For more information, see AMI types and Find a Linux AMI.
After you launch an instance from an AMI, you can connect to it. When you are connected to an instance, you can use it just like you use any other server. For information about launching, connecting, and using your instance, see Tutorial: Get started with Amazon EC2 Linux instances.
Create your own AMI
You can launch an instance from an existing AMI, customize the instance (for example, install software on the instance), and then save this updated configuration as a custom AMI. Instances launched from this new custom AMI include the customizations that you made when you created the AMI.
The root storage device of the instance determines the process you follow to create an AMI. The root volume of an instance is either an Amazon Elastic Block Store (Amazon EBS) volume or an instance store volume. For more information about the root device volume, see Amazon EC2 instance root volume.
-
To create an Amazon EBS-backed AMI, see Create an Amazon EBS-backed Linux AMI.
-
To create an instance store-backed AMI, see Create an instance store-backed Linux AMI.
To help categorize and manage your AMIs, you can assign custom tags to them. For more information, see Tag your Amazon EC2 resources.
Buy, share, and sell AMIs
After you create an AMI, you can keep it private so that only you can use it, or you can share it with a specified list of AWS accounts. You can also make your custom AMI public so that the community can use it. Building a safe, secure, usable AMI for public consumption is a fairly straightforward process, if you follow a few simple guidelines. For information about how to create and use shared AMIs, see Shared AMIs.
You can purchase AMIs from a third party, including AMIs that come with service contracts from organizations such as Red Hat. You can also create an AMI and sell it to other Amazon EC2 users. For more information about buying or selling AMIs, see Paid AMIs.
Deregister your AMI
You can deregister an AMI when you have finished with it. After you deregister an AMI, it can't be used to launch new instances. Existing instances launched from the AMI are not affected. For more information, see Deregister (delete) an AMI.
AL2023 and Amazon Linux 2
The latest release of Amazon Linux, AL2023, is optimized for Amazon EC2 and is provided at no additional cost to Amazon EC2 users. The features of AL2023 include a predictable release cadence, frequent updates, and long-term support.
For more information about AL2023 features and launching an AL2023 AMI, see:
Amazon Linux 2 provides a stable, secure, and high performance execution environment for applications running on Amazon EC2. For information about Amazon Linux 2 EOL,
see Amazon Linux 2 FAQs
Note
The Amazon Linux AMI reached its end-of-life on December 31, 2023 and will not receive any
security updates or bug fixes starting January 1, 2024. For more information about
the Amazon Linux AMI end-of-life and maintenance support, see the blog post Update
on Amazon Linux AMI end-of-life
