Amazon EC2 is hosted in multiple locations world-wide. These locations are composed of AWS Regions, Availability Zones, Local Zones, AWS Outposts, and Wavelength Zones.
-
Regions are separate geographic areas.
-
Availability Zones are multiple, isolated locations within each Region.
-
Local Zones provide you with the ability to place resources, such as compute and storage, in multiple locations closer to your end users.
-
Wavelength Zones provide you with the ability to build applications that deliver ultra-low latencies to 5G devices and end users. Wavelength deploys standard AWS compute and storage services to the edge of telecommunication carriers' 5G networks.
-
AWS Outposts brings native AWS services, infrastructure, and operating models to virtually any data center, colocation space, or on-premises facility.
AWS operates state-of-the-art, highly available data centers. Although rare, failures can occur that affect the availability of instances that are in the same location. If you host all of your instances in a single location that is affected by a failure, none of your instances would be available.
For more information, see AWS Global
Infrastructure
Regions
Each Region is designed to be isolated from the other Regions. This achieves the greatest possible fault tolerance and stability.
When you launch an instance, select a Region that puts your instances close to specific customers, or that meets the legal or other requirements that you have. You can launch instances in multiple Regions.
When you view your resources, you see only the resources that are tied to the Region that you specified. This is because Regions are isolated from each other, and we don't automatically replicate resources across Regions.
Available Regions
For the list of available Regions, see AWS Regions.
Regional endpoints for Amazon EC2
When you work with an instance using the command line interface or API actions, you must specify its Regional endpoint. For more information about the Regions and endpoints for Amazon EC2, see Amazon EC2 service endpoints in the Amazon EC2 Developer Guide.
Availability Zones
Each Region has multiple, isolated locations known as Availability
Zones. The code for an Availability Zone is its Region code followed by a
letter identifier. For example, us-east-1a.
By launching EC2 instances in multiple Availability Zones, you can protect your applications from the failure of a single location in the Region.
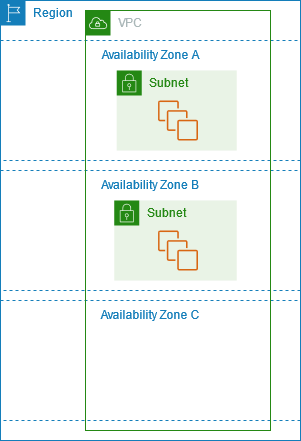
The following diagram illustrates multiple Availability Zones in an AWS Region. Availability Zone A and Availability Zone B each have one subnet, and each subnet has EC2 instances. Availability Zone C has no subnets, therefore you can't launch instances into this Availability Zone.
For more information, see Virtual private clouds for your EC2 instances.
Availability Zones by Region
For the list of Availability Zones by Region, see AWS Availability Zones.
Instances in Availability Zones
When you launch an instance, you select a Region and a virtual private cloud (VPC). Then, you can either select a subnet from one of the Availability Zones or let us choose a subnet for you. When you launch your initial instances, we recommend that you let us select an Availability Zone for you based on system health and available capacity. If you launch additional instances, specify an Availability Zone only if your new instances must be close to, or separated from, your existing instances.
If you distribute instances across multiple Availability Zones and an instance fails, you can design your application so that an instance in another Availability Zone handles requests instead.
Local Zones
A Local Zone is an extension of an AWS Region in geographic proximity to your users. Local Zones have their own connections to the internet and support AWS Direct Connect, so that resources created in a Local Zone can serve local users with low-latency communications. For more information, see What is AWS Local Zones? in the AWS Local Zones User Guide.
The code for a Local Zone is its Region code followed by an identifier that indicates its
physical location. For example, us-west-2-lax-1 in Los Angeles.
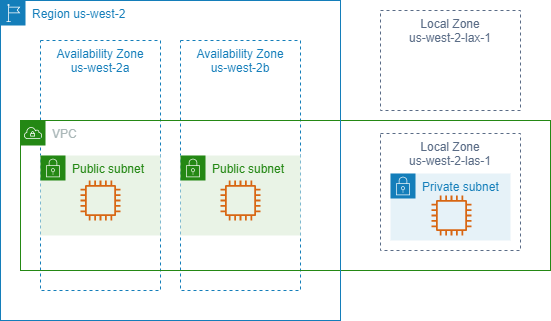
The following diagram illustrates the AWS Region us-west-2, two of its
Availability Zones, and two of its Local Zones. The VPC spans the Availability Zones and
one of the Local Zones. Each zone in the VPC has one subnet, and each subnet has an
instance.
Available Local Zones
For the list of available Local Zones, see Available Local Zones
in the AWS Local Zones User Guide.
For the list of announced Local Zones, see AWS Local Zones locations
Instances in Local Zones
To use a Local Zone, you must first enable it. Then, create a subnet in the Local Zone. You can specify the Local Zone subnet when you launch instances, which places it in the Local Zone subnet in the Local Zone.
When you launch an instance in a Local Zone, you also allocate an IP address from
a network border group. A network border group is a unique set of Availability
Zones, Local Zones, or Wavelength Zones from which AWS advertises IP addresses,
for example, us-west-2-lax-1a. You can allocate the following IP
addresses from a network border group:
-
Amazon-provided Elastic IPv4 addresses
-
Amazon-provided IPv6 VPC addresses (available only in the Los Angeles zones)
For more information about how to launch an instance in a Local Zone, see Getting started with AWS Local Zones in the AWS Local Zones User Guide.
Wavelength Zones
AWS Wavelength enables developers to build applications that deliver ultra-low latencies to mobile devices and end users. Wavelength deploys standard AWS compute and storage services to the edge of telecommunication carriers' 5G networks. Developers can extend a virtual private cloud (VPC) to one or more Wavelength Zones, and then use AWS resources like Amazon EC2 instances to run applications that require ultra-low latency and a connection to AWS services in the Region.
A Wavelength Zone is an isolated zone in the carrier location where the Wavelength infrastructure is deployed. Wavelength Zones are tied to a Region. A Wavelength Zone is a logical extension of a Region, and is managed by the control plane in the Region.
The code for a Wavelength Zone is its Region code followed by an identifier that
indicates the physical location. For example, us-east-1-wl1-bos-wlz-1 in
Boston.
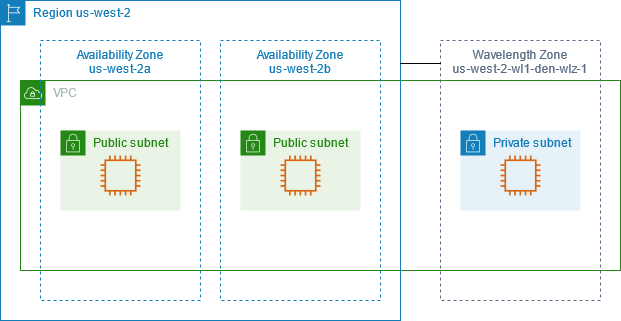
The following diagram illustrates the AWS Region us-west-2, two of its
Availability Zones, and a Wavelength Zone. The VPC spans the Availability Zones and the
Wavelength Zone. Each zone in the VPC has one subnet, and each subnet has an
instance.
Wavelength Zones are not available in every Region. For information about the Regions that support Wavelength Zones, see Available Wavelength Zones in the AWS Wavelength Developer Guide.
Available Wavelength Zones
For the list of available Wavelength Zones, see Available Wavelength Zones in the AWS Wavelength Guide.
Instances in Wavelength Zones
To use a Wavelength Zone, you must first opt in to the Zone. Then, create a subnet
in the Wavelength Zone. You can specify the Wavelength subnet when you launch instances.
You also allocate a carrier IP address from a network border group, which is a
unique set of Availability Zones, Local Zones, or Wavelength Zones from which AWS
advertises IP addresses, for example, us-east-1-wl1-bos-wlz-1.
For step-by-step directions to launch an instance in a Wavelength Zone, see Get started with AWS Wavelength in the AWS Wavelength Developer Guide.
AWS Outposts
AWS Outposts is a fully managed service that extends AWS infrastructure, services, APIs, and tools to customer premises. By providing local access to AWS managed infrastructure, AWS Outposts enables customers to build and run applications on premises using the same programming interfaces as in AWS Regions, while using local compute and storage resources for lower latency and local data processing needs.
An Outpost is a pool of AWS compute and storage capacity deployed at a customer site. AWS operates, monitors, and manages this capacity as part of an AWS Region. You can create subnets on your Outpost and specify them when you create AWS resources. Instances in Outpost subnets communicate with other instances in the AWS Region using private IP addresses, all within the same VPC.
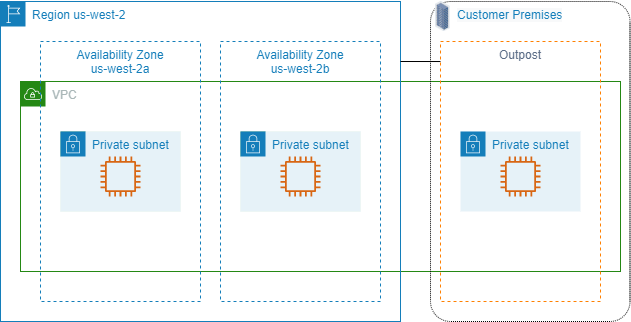
The following diagram illustrates the AWS Region us-west-2, two of its
Availability Zones, and an Outpost. The VPC spans the Availability Zones and the
Outpost. The Outpost is in an on-premises customer data center. Each zone in the VPC has
one subnet, and each subnet has an instance.
Instances on an Outpost
To begin using AWS Outposts, you must create an Outpost and order Outpost capacity.
AWS Outposts offers two form factors, Outposts racks and Outposts servers. For
more information about Outposts configurations, see AWS Outposts Family
To launch EC2 instances, you must create an Outpost subnet. Security groups control inbound and outbound traffic for instances in an Outpost subnet, just as they do for instances in an Availability Zone subnet. To connect to instances in Outpost subnets using SSH, specify a key pair when you launch them, just as you do for instances in Availability Zone subnets.
For more information, see Get started with Outposts racks or Get started with Outposts servers.
Volumes on an Outposts rack
If your Outposts compute capacity is on an Outpost rack, you can create EBS volumes in the Outpost subnet that you created. When you create the volume, specify the Amazon Resource Name (ARN) of the Outpost.
The following create-volume
aws ec2 create-volume --availability-zoneus-east-2a--outpost-arn arn:aws:outposts:us-east-2:123456789012:outpost/op-03e6fecad652a6138--size50
You can dynamically modify the size of your Amazon EBS gp2 volumes without detaching them. For more information about modifying a volume without detaching it, see Request modifications to your EBS volumes in the Amazon EBS User Guide.
We recommend that you limit the root volume for an instance on an Outpost rack to
30 GiB or smaller. You can specify data volumes in the block device mapping of the
AMI or the instance to provide additional storage. To trim unused blocks from the
boot volume, see How to Build Sparse EBS Volumes
We recommend that you increase the NVMe timeout for the root volume. For more information, see I/O operation timeout in the Amazon EBS User Guide.
Volumes on an Outposts server
Instances on Outposts servers provide instance store volumes but do not support EBS volumes. Choose an Amazon EBS-backed AMI with only a single EBS snapshot. Choose an instance size with enough instance storage to meet the needs of your application. For more information, see Instance store volume limits.
