Connect to your Linux instance
There are many ways to connect to your Linux instance. Some vary depending on the operating system of the local machine that you connect from. Others, like EC2 Instance Connect or AWS Systems Manager Session Manager, don't vary. In this section, you can learn how to connect to your Linux instance and transfer files between your local computer and your instance. For information about how to connect to a Windows instance, see Connect to your Windows instance in the Amazon EC2 User Guide for Windows Instances.
Before you connect to your Linux instance, complete the following prerequisites.
Then, choose from one of the following options to connect to your Linux instance.
Options to connect based on your local operating system
Options to connect from any local operating system
Note
For instance connection troubleshooting tips, see Troubleshoot connecting to your instance.
To troubleshoot boot, network configuration, and other issues for instances built on the
AWS Nitro System
Get information about your instance
To prepare to connect to an instance, get the following information from the Amazon EC2 console or by using the AWS CLI.
-
Get the public DNS name of the instance.
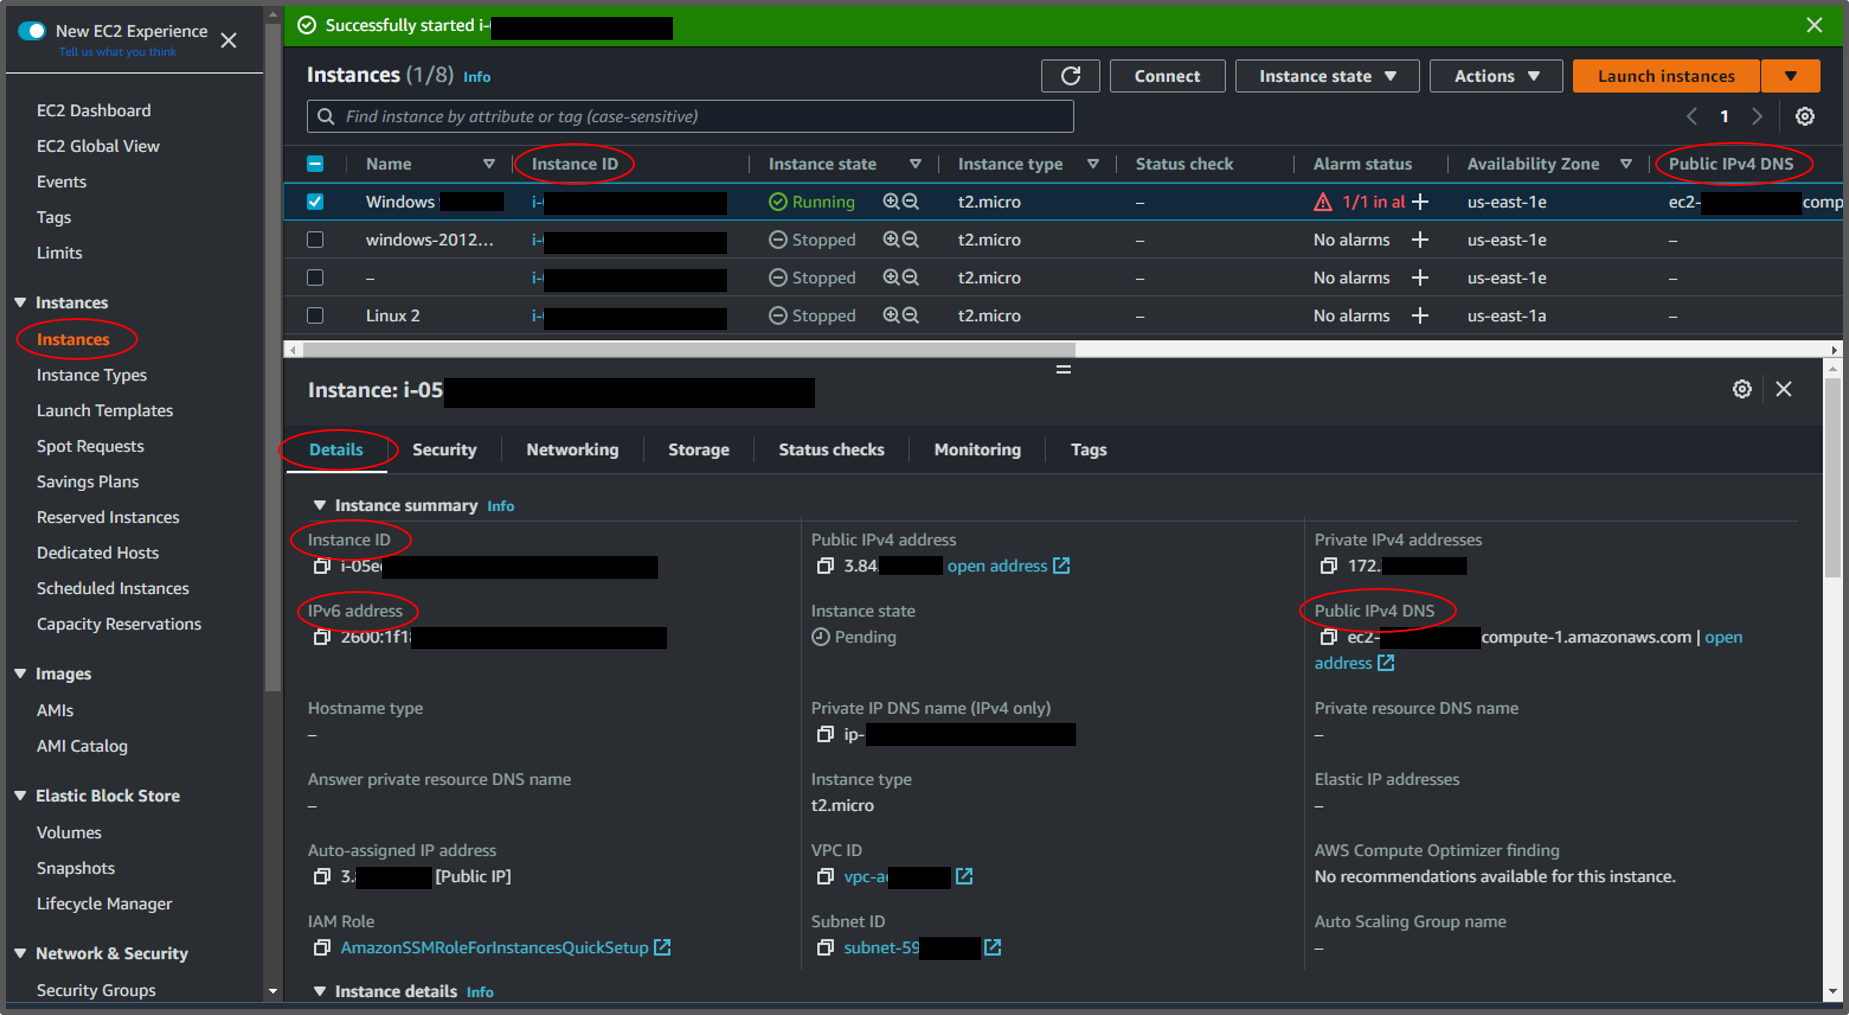
You can get the public DNS for your instance from the Amazon EC2 console. Check the Public IPv4 DNS column of the Instances pane. If this column is hidden, choose the settings icon (
 ) in the top-right corner of the screen, and select
Public IPv4 DNS. You can also find the public DNS in the
instance information section of the Instances pane. When you
select the instance in the Instances pane of the Amazon EC2 console,
information about that instance will appear on the lower half of the page. Under the
Details tab, look for Public IPv4
DNS.
) in the top-right corner of the screen, and select
Public IPv4 DNS. You can also find the public DNS in the
instance information section of the Instances pane. When you
select the instance in the Instances pane of the Amazon EC2 console,
information about that instance will appear on the lower half of the page. Under the
Details tab, look for Public IPv4
DNS.If you prefer, you can use the describe-instances (AWS CLI) or Get-EC2Instance (AWS Tools for Windows PowerShell) commands.
If no Public IPv4 DNS is displayed, verify that the Instance state is Running, and that you have not launched the instance in a private subnet. If you launched your instance using the launch instance wizard, you may have edited the Auto-assign public IP field under Network settings and changed the value to Disable. If you disable the Auto-assign public IP option, the instance is not assigned a public IP address when it is launched.
-
(IPv6 only) Get the IPv6 address of the instance.
If you assigned an IPv6 address to your instance, you can optionally connect to the instance using its IPv6 address instead of a public IPv4 address or public IPv4 DNS hostname. Your local computer must have an IPv6 address and must be configured to use IPv6. You can get the IPv6 address of your instance from the Amazon EC2 console. Check the IPv6 IPs column of the Instances pane. Or, you can find the IPv6 address in the instance information section. When you select the instance in the Instances pane of the Amazon EC2 console, information about that instance will appear on the lower half of the page. Under the Details tab, look for IPv6 address.
If you prefer, you can use the describe-instances (AWS CLI) or Get-EC2Instance (AWS Tools for Windows PowerShell) commands. For more information about IPv6, see IPv6 addresses.
Get the user name for your instance.
You can connect to your instance using the username for your user account or the default username for the AMI that you used to launch your instance.
-
Get the username for your user account.
For more information about how to create a user account, see Manage users on your Linux instance.
-
Get the default username for the AMI that you used to launch your instance:
AMI used to launch instance Default username AL2023
Amazon Linux 2
Amazon Linux
ec2-userCentOS centosorec2-userDebian adminFedora fedoraorec2-userRHEL ec2-userorrootSUSE ec2-userorrootUbuntu ubuntuOracle ec2-userBitnami bitnamiRocky Linux rockyOther Check with the AMI provider
-
Locate the private key and set permissions
You must know the location of your private key file to connect to your instance. For SSH connections, you must set the permissions so that only you can read the file.
For information about how key pairs work when using Amazon EC2, see Amazon EC2 key pairs and Amazon EC2 instances.
Locate the private key
Get the fully-qualified path to the location on your computer of the
.pemfile for the key pair that you specified when you launched the instance. For more information, see Identify the public key specified at launch. If you can't find your private key file, see I've lost my private key. How can I connect to my Linux instance?If you are connecting to your instance using Putty and need to convert the
.pemfile to.ppk, see Convert your private key using PuTTYgen in the Connect to your Linux instance from Windows with PuTTY topic in this section.-
Set the permissions of your private key so that only you can read it
Connect from macOS or Linux
If you plan to use an SSH client on a macOS or Linux computer to connect to your Linux instance, use the following command to set the permissions of your private key file so that only you can read it.
chmod 400key-pair-name.pemIf you do not set these permissions, then you cannot connect to your instance using this key pair. For more information, see Error: Unprotected private key file.
Connect from Windows
Open File Explorer and right-click on the
.pemfile. Select Properties > Security tab and choose Advanced. Choose Disable inheritance. Remove access to all users except for the current user.
(Optional) Get the instance fingerprint
To protect yourself from man-in-the-middle attacks, you can verify the authenticity of the instance you're about to connect to by verifying the fingerprint that is displayed. Verifying the fingerprint is useful if you launched your instance from a public AMI provided by a third party.
Task overview
First, get the instance fingerprint from the instance. Then, when you connect to the instance and are prompted to verify the fingerprint, compare the fingerprint you obtained in this procedure with the fingerprint that is displayed. If the fingerprints don't match, someone might be attempting a man-in-the-middle attack. If they match, you can confidently connect to your instance.
Prerequisites to get the instance fingerprint
-
The instance must not be in the
pendingstate. The fingerprint is available only after the first boot of the instance is complete. -
You must be the instance owner to get the console output.
-
There are various ways to get the instance fingerprint. If you want to use the AWS CLI, it must be installed on your local computer. For information about installing the AWS CLI, see Installing the AWS Command Line Interface in the AWS Command Line Interface User Guide.
To get the instance fingerprint
In Step 1, you get the console output, which includes the instance fingerprint. In Step 2, you find the instance fingerprint in the console output.
-
Get the console output using one of the following methods.
-
In the console output, find the instance (host) fingerprint, which is located under
BEGIN SSH HOST KEY FINGERPRINTS. There might be several instance fingerprints. When you connect to your instance, it will display only one of the fingerprints.The exact output can vary by operating system, AMI version, and whether AWS created the key pairs. The following is example output.
ec2:#############################################################
ec2: -----BEGIN SSH HOST KEY FINGERPRINTS-----
ec2: 256 SHA256:l4UB/neBad9tvkgJf1QZWxheQmR59WgrgzEimCG6kZY no comment (ECDSA)
ec2: 256 SHA256:kpEa+rw/Uq3zxaYZN8KT501iBtJOIdHG52dFi66EEfQ no comment (ED25519)
ec2: 2048 SHA256:L8l6pepcA7iqW/jBecQjVZClUrKY+o2cHLI0iHerbVc no comment (RSA)
ec2: -----END SSH HOST KEY FINGERPRINTS-----
ec2: #############################################################
Note
You'll reference this fingerprint when you connect to the instance.
