Tutorial: Get started with Amazon EC2 Linux instances
Use this tutorial to get started with Amazon Elastic Compute Cloud (Amazon EC2). You'll learn how to launch, connect to, and use a Linux instance. An instance is a virtual server in the AWS Cloud. With Amazon EC2, you can set up and configure the operating system and applications that run on your instance.
When you sign up for AWS, you can get started with Amazon EC2 using the AWS Free Tier
Related tutorials
-
If you'd prefer to launch a Windows instance, see this tutorial in the Amazon EC2 User Guide for Windows Instances: Get started with Amazon EC2 Windows instances.
-
If you'd prefer to use the command line, see this tutorial in the AWS Command Line Interface User Guide: Using Amazon EC2 through the AWS CLI.
Contents
Overview
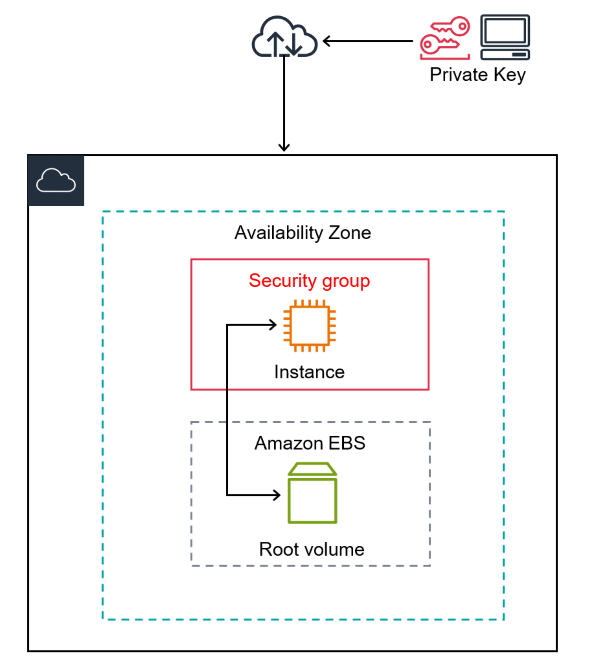
The instance launched in this tutorial is an Amazon EBS-backed instance (meaning that the root volume is an EBS volume). You can either specify the Availability Zone in which your instance runs, or let Amazon EC2 select an Availability Zone for you. Availability Zones are multiple, isolated locations within each AWS Region. You can think of an Availability Zone as an isolated data center.
When you launch your instance, you secure it by specifying a key pair (to prove your identity) and a security group (which acts as a virtual firewall to control ingoing and outgoing traffic). When you connect to your instance, you must provide the private key of the key pair that you specified when you launched your instance.
Prerequisites
Before you begin, be sure that you've completed the steps in Set up to use Amazon EC2.
Step 1: Launch an instance
You can launch a Linux instance using the AWS Management Console as described in the following procedure. This tutorial is intended to help you quickly launch your first instance, so it doesn't cover all possible options. For information about advanced options, see Launch an instance using the new launch instance wizard. For information about other ways to launch your instance, see Launch your instance.
To launch an instance
Open the Amazon EC2 console at https://console.aws.amazon.com/ec2/
. -
From the EC2 console dashboard, in the Launch instance box, choose Launch instance.
-
Under Name and tags, for Name, enter a descriptive name for your instance.
-
Under Application and OS Images (Amazon Machine Image), do the following:
-
Choose Quick Start, and then choose Amazon Linux. This is the operating system (OS) for your instance.
-
From Amazon Machine Image (AMI), select an HVM version of Amazon Linux 2. Notice that these AMIs are marked Free Tier eligible. An Amazon Machine Image (AMI) is a basic configuration that serves as a template for your instance.
Note
AL2023 is the successor to Amazon Linux 2. For more information, see Launching AL2023 using the Amazon EC2 console.
-
-
Under Instance type, from the Instance type list, you can select the hardware configuration for your instance. Choose the
t2.microinstance type, which is selected by default. Thet2.microinstance type is eligible for the Free Tier. In Regions wheret2.microis unavailable, you can use at3.microinstance under the Free Tier. For more information, see AWS Free Tier. -
Under Key pair (login), for Key pair name, choose the key pair that you created when getting set up.
Warning
Do not choose Proceed without a key pair (Not recommended). If you launch your instance without a key pair, then you can't connect to it.
-
Next to Network settings, choose Edit. For Security group name, you'll see that the wizard created and selected a security group for you. You can use this security group, or alternatively you can select the security group that you created when getting set up using the following steps:
-
Choose Select existing security group.
-
From Common security groups, choose your security group from the list of existing security groups.
-
-
Keep the default selections for the other configuration settings for your instance.
-
Review a summary of your instance configuration in the Summary panel, and when you're ready, choose Launch instance.
-
A confirmation page lets you know that your instance is launching. Choose View all instances to close the confirmation page and return to the console.
-
On the Instances screen, you can view the status of the launch. It takes a short time for an instance to launch. When you launch an instance, its initial state is
pending. After the instance starts, its state changes torunningand it receives a public DNS name. If the Public IPv4 DNS column is hidden, choose the settings icon ( ) in the top-right corner, toggle on Public IPv4
DNS, and choose Confirm.
) in the top-right corner, toggle on Public IPv4
DNS, and choose Confirm. -
It can take a few minutes for the instance to be ready for you to connect to it. Check that your instance has passed its status checks; you can view this information in the Status check column.
Step 2: Connect to your instance
There are several ways to connect to your Linux instance. For more information, see Connect to your Linux instance.
Important
You can't connect to your instance unless you launched it with a key pair for
which you have the .pem file and you launched it with a
security group that allows SSH access from your computer. If you can't connect to
your instance, see Troubleshoot connecting to your
instance for assistance.
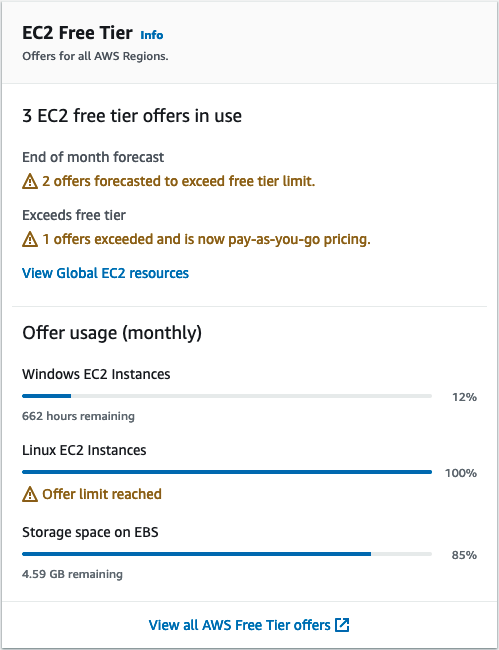
Step 3: Track your Free Tier usage
You can use Amazon EC2 without incurring charges if you've been an AWS customer for less than 12 months and you stay within the Free Tier usage limits. It's important to track your Free Tier usage to avoid billing surprises. If you exceed the Free Tier limits, you'll incur standard pay-as-go charges.
Note
If you've been an AWS customer for more than 12 months, you're no longer eligible for Free Tier usage and you won't see the EC2 Free Tier box that is described in the following procedure.
To track your Free Tier usage
-
In the navigation pane, choose EC2 Dashboard.
-
Find the EC2 Free Tier box (at top right).
-
In the EC2 Free Tier box, check your Free Tier usage, as follows:
-
Under EC2 Free Tier offers in use, take note of the warnings:
-
End of month forecast – This warns that you will incur charges this month if you continue with your current usage pattern.
-
Exceeds Free Tier – This warns that you've exceeded your Free Tier limits and you're already incurring charges.
-
-
Under Offer usage (monthly), take note of your usage of Linux instances, Windows instances, and EBS storage. The percentage indicates how much of your Free Tier limits you've used this month. If you're at 100%, you will incur charges for further use.
Note
This information appears only after you've created an instance. However, usage information is not updated in real time; it's updated three times a day.
-
-
To avoid incurring further charges, delete any resources that are either incurring charges now, or will incur charges if you exceed your Free Tier limit usage.
-
For the instructions to delete your instance, go to the next step in this tutorial.
-
To check if you have resources in other Regions that might be incurring charges, in the EC2 Free Tier box, choose View Global EC2 resources to open the EC2 Global View. For more information, see Amazon EC2 Global View.
-
-
To view your resource usage for all AWS services under the AWS Free Tier, at the bottom of the EC2 Free Tier box, choose View all AWS Free Tier offers. For more information, see Using the AWS Free Tier in the AWS Billing User Guide.
Step 4: Clean up your instance
After you've finished with the instance that you created for this tutorial, you should clean up by terminating the instance. If you want to do more with this instance before you clean up, see Next steps.
Important
Terminating an instance effectively deletes it; you can't reconnect to an instance after you've terminated it.
If you launched an instance that is not within the AWS Free Tiershutting down or terminated. To
keep your instance for later, but not incur charges, you can stop the instance now and
then start it again later. For more information, see Stop and start Amazon EC2 instances.
To terminate your instance
-
In the navigation pane, choose Instances. In the list of instances, select the instance.
-
Choose Instance state, Terminate instance.
-
Choose Terminate when prompted for confirmation.
Amazon EC2 shuts down and terminates your instance. After your instance is terminated, it remains visible on the console for a short while, and then the entry is automatically deleted. You cannot remove the terminated instance from the console display yourself.
Next steps
After you start your instance, you might want to try some of the following exercises:
-
Learn how to remotely manage your EC2 instance using the Run command. For more information, see AWS Systems Manager Run Command in the AWS Systems Manager User Guide.
-
Configure a CloudWatch alarm to notify you if your usage exceeds the Free Tier. For more information, see Tracking your AWS Free Tier usage in the AWS Billing User Guide.
-
Add an EBS volume. For more information, see Create an Amazon EBS volume in the Amazon EBS User Guide.
-
Install the LAMP stack. For more information, see Install LAMP on Amazon Linux 2.
-
Learn about instance purchasing options. For more information, see Instance purchasing options.
-
Get advice about instance types. For more information, see Get instance type recommendations for a new workload.
