Work with Spot Instances
To use Spot Instances, you create a Spot Instance request that includes the desired number of instances, the
instance type, and the Availability Zone. If capacity is available, Amazon EC2 fulfills your
request immediately. Otherwise, Amazon EC2 waits until your request can be fulfilled or until
you cancel the request.
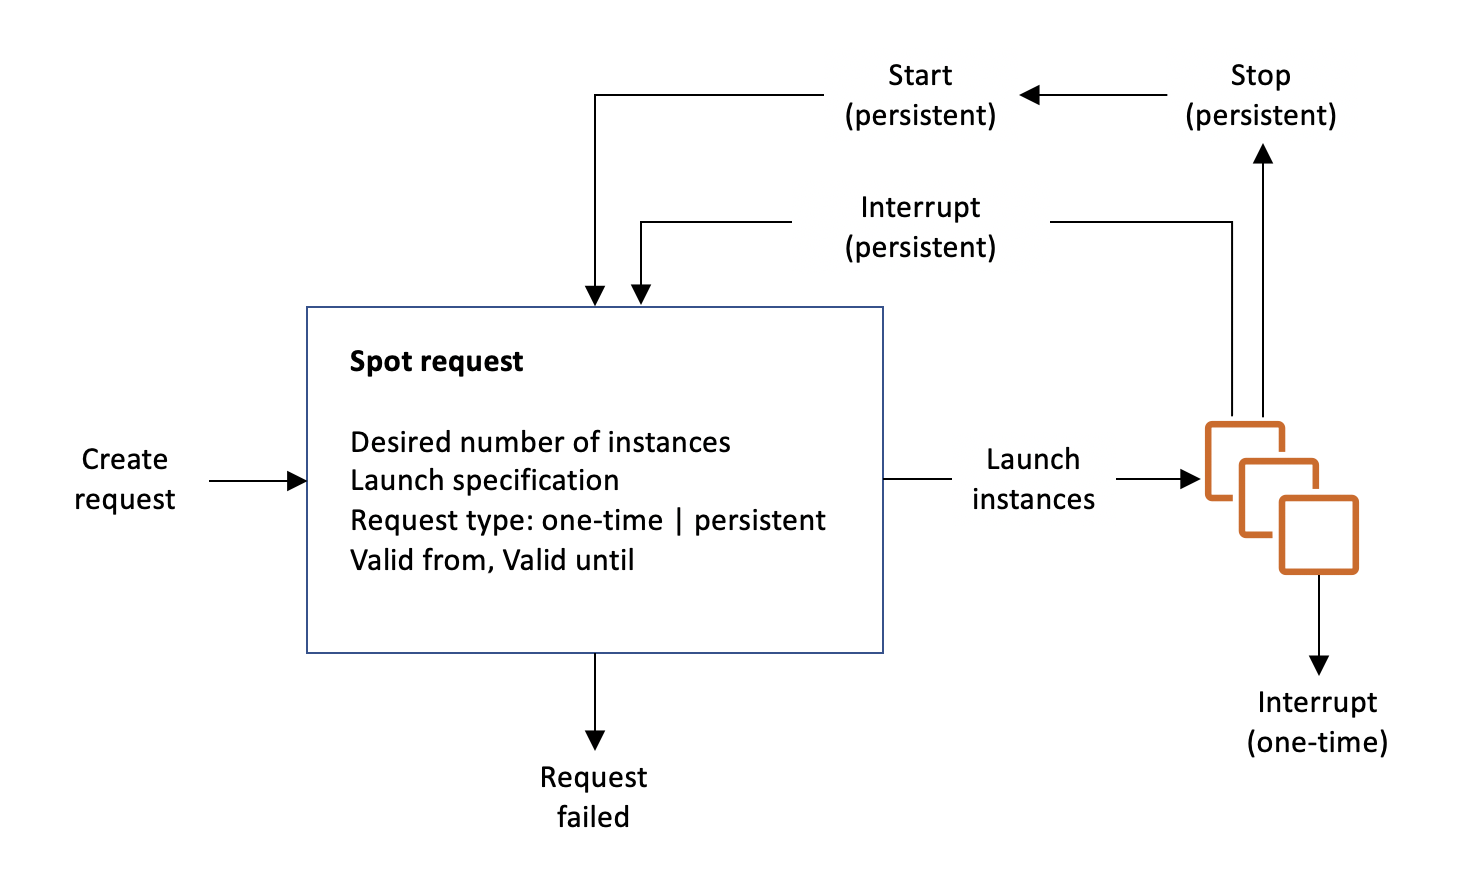
The following illustration shows how Spot Instance requests work. Notice that the request type
(one-time or persistent) determines whether the request is opened again when Amazon EC2
interrupts a Spot Instance or if you stop a Spot Instance. If the request is persistent, the request is
opened again after your Spot Instance is interrupted. If the request is persistent and you stop
your Spot Instance, the request only opens after you start your Spot Instance.
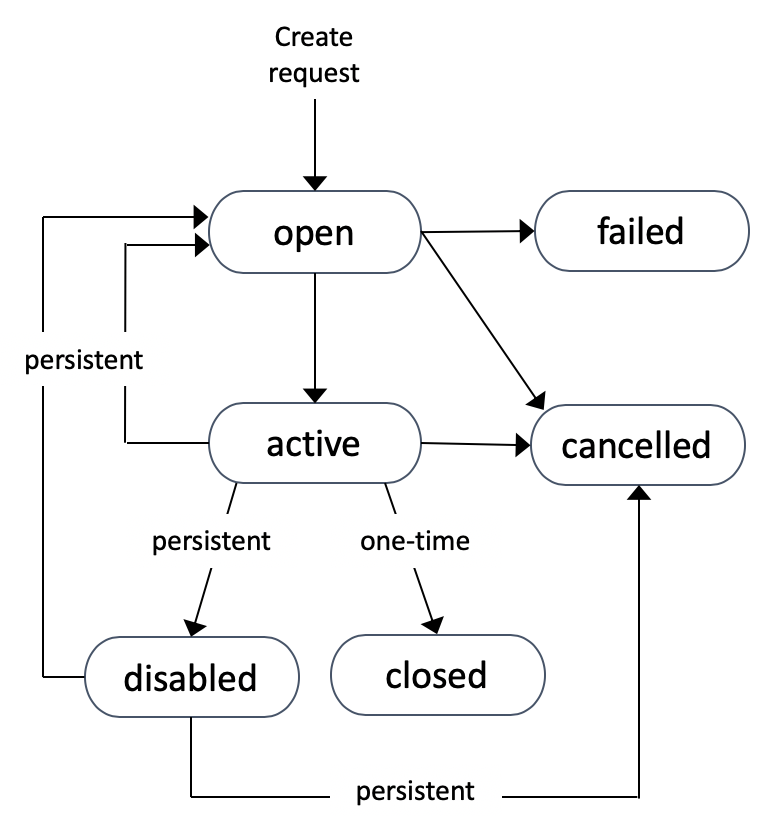
Spot Instance request states
A Spot Instance request can be in one of the following states:
-
open – The request is waiting to be fulfilled.
-
active – The request is fulfilled and has an associated Spot Instance.
-
failed – The request has one or more bad
parameters.
-
closed – The Spot Instance was interrupted or terminated.
-
disabled – You stopped the Spot Instance.
-
cancelled – You canceled the request, or the request
expired.
The following illustration represents the transitions between the request states.
Notice that the transitions depend on the request type (one-time or
persistent).
A one-time Spot Instance request remains active until Amazon EC2 launches the Spot Instance, the request expires,
or you cancel the request. If capacity is not available, your Spot Instance is terminated and
the Spot Instance request is closed.
A persistent Spot Instance request remains active until it expires or you cancel it, even if the
request is fulfilled. If capacity is not available, your Spot Instance is interrupted. After
your instance is interrupted, when capacity becomes available again, the Spot Instance is
started if stopped or resumed if hibernated. You can stop a Spot Instance and start it again
if capacity is available. If the Spot Instance is terminated (irrespective of whether the
Spot Instance is in a stopped or running state), the Spot Instance request is opened again and Amazon EC2
launches a new Spot Instance. For more information, see Stop a Spot Instance,
Start a Spot Instance, and Terminate a Spot Instance.
You can track the status of your Spot Instance requests, as well as the status of the Spot Instances
launched, through the status. For more information, see Spot request status.
Specify a tenancy for your Spot Instances
You can run a Spot Instance on single-tenant hardware. Dedicated Spot Instances are physically
isolated from instances that belong to other AWS accounts. For more information, see
Dedicated Instances and the
Amazon
EC2 Dedicated Instances product page.
To run a Dedicated Spot Instance, do one of the following:
-
Specify a tenancy of dedicated when you create the Spot Instance request.
For more information, see Create a Spot Instance request.
-
Request a Spot Instance in a VPC with an instance tenancy of
dedicated. For more information, see Create a VPC with a dedicated instance tenancy.
You cannot request a Spot Instance with a tenancy of default if you
request it in a VPC with an instance tenancy of
dedicated.
All instance families support Dedicated Spot Instances except T instances. For each supported
instance family, only the largest instance size or metal size supports Dedicated
Spot Instances.
Service-linked role for Spot Instance
requests
Amazon EC2 uses service-linked roles for the permissions that it requires to call other
AWS services on your behalf. A service-linked role is a unique type of IAM role
that is linked directly to an AWS service. Service-linked roles provide a secure
way to delegate permissions to AWS services because only the linked service can
assume a service-linked role. For more information, see Using Service-Linked
Roles in the IAM User Guide.
Amazon EC2 uses the service-linked role named
AWSServiceRoleForEC2Spot to launch and manage Spot Instances on your
behalf.
Permissions granted by AWSServiceRoleForEC2Spot
Amazon EC2 uses AWSServiceRoleForEC2Spot to complete the
following actions:
-
ec2:DescribeInstances – Describe Spot Instances
-
ec2:StopInstances – Stop Spot Instances
-
ec2:StartInstances – Start Spot Instances
Create the service-linked role
Under most circumstances, you don't need to manually create a service-linked
role. Amazon EC2 creates the AWSServiceRoleForEC2Spot
service-linked role the first time you request a Spot Instance using the console.
If you had an active Spot Instance request before October 2017, when Amazon EC2 began
supporting this service-linked role, Amazon EC2 created the
AWSServiceRoleForEC2Spot role in your AWS account. For
more information, see A New Role Appeared in My Account in the
IAM User Guide.
If you use the AWS CLI or an API to request a Spot Instance, you must first ensure that
this role exists.
To create AWSServiceRoleForEC2Spot using the console
Open the IAM console at
https://console.aws.amazon.com/iam/.
-
In the navigation pane, choose Roles.
-
Choose Create role.
-
On the Select type of trusted entity page, choose
EC2, EC2 - Spot Instances,
Next: Permissions.
-
On the next page, choose Next:Review.
-
On the Review page, choose Create
role.
To create AWSServiceRoleForEC2Spot using the AWS CLI
Use the create-service-linked-role command as follows.
aws iam create-service-linked-role --aws-service-name spot.amazonaws.com
If you no longer need to use Spot Instances, we recommend that you delete the
AWSServiceRoleForEC2Spot role. After this role is
deleted from your account, Amazon EC2 will create the role again if you request
Spot Instances.
Grant access to customer managed keys for
use with encrypted AMIs and EBS snapshots
If you specify an encrypted AMI or an
encrypted Amazon EBS snapshot for your Spot Instances and you use a customer managed key for encryption, you
must grant the AWSServiceRoleForEC2Spot role permission to
use the customer managed key so that Amazon EC2 can launch Spot Instances on your behalf. To do this, you must
add a grant to the customer managed key, as shown in the following procedure.
When providing permissions, grants are an alternative to key policies. For
more information, see Using Grants
and Using Key Policies in AWS KMS
in the AWS Key Management Service Developer Guide.
To grant the AWSServiceRoleForEC2Spot role permissions to use the
customer managed key
-
Use the create-grant command to add a grant to the customer managed key and to
specify the principal (the AWSServiceRoleForEC2Spot
service-linked role) that is given permission to perform the operations
that the grant permits. The customer managed key is specified by the key-id
parameter and the ARN of the customer managed key. The principal is specified by the
grantee-principal parameter and the ARN of the
AWSServiceRoleForEC2Spot service-linked
role.
aws kms create-grant \
    --region us-east-1 \
    --key-id arn:aws:kms:us-east-1:444455556666:key/1234abcd-12ab-34cd-56ef-1234567890ab \
    --grantee-principal arn:aws:iam::111122223333:role/aws-service-role/spot.amazonaws.com/AWSServiceRoleForEC2Spot \
    --operations "Decrypt" "Encrypt" "GenerateDataKey" "GenerateDataKeyWithoutPlaintext" "CreateGrant" "DescribeKey" "ReEncryptFrom" "ReEncryptTo"
Create a Spot Instance request
You can use the launch instance wizard in the Amazon EC2 console or the run-instances AWS CLI command to
request a Spot Instance in the same way that you can launch an On-Demand Instance. This method is only
recommended for the following reasons:
-
You're already using the launch instance wizard or run-instances command
to launch On-Demand Instances, and you simply want to change to launching Spot Instances
by changing a single parameter.
-
You do not need multiple instances with different instance types.
This method is generally not recommended for launching Spot Instances because you can't specify
multiple instance types, and you can't launch Spot Instances and On-Demand Instances in the same request.
For the preferred methods for launching Spot Instances, which include launching a fleet that includes Spot Instances and On-Demand Instances with multiple
instance types, see Which is the best Spot request method to use?
If you request multiple Spot Instances at one time, Amazon EC2 creates separate Spot Instance requests so
that you can track the status of each request separately. For more information about
tracking Spot Instance requests, see Spot request status.
- New console
-
To create a Spot Instance request
using the launch instance wizard
Steps 1–9 are the same steps you'd use to launch an On-Demand Instance. At Step 10, you
configure the Spot Instance request.
Open the Amazon EC2 console at
https://console.aws.amazon.com/ec2/.
-
In the navigation bar at the top of the screen, select a Region.
-
From the Amazon EC2 console dashboard, choose Launch instance.
-
(Optional) Under Name and tags, you can name your instance, and
tag the Spot Instance request, the instance, the volumes, and the elastic
graphics. For information about tags, see Tag your Amazon EC2 resources.
-
For Name, enter a descriptive name for your instance.
The instance name is a tag, where the key is Name, and the value is the
name that you specify. If you don't specify a name, the
instance can be identified by its ID, which is
automatically generated when you launch the
instance.
-
To tag the Spot Instance request, the instance, the volumes, and the elastic graphics, choose
Add additional tags. Choose
Add tag, and then enter a key
and value, and select the resource type to tag. Choose
Add tag again for each
additional tag to add.
-
Under Application and OS Images (Amazon Machine Image), choose
the operating system (OS) for your instance, and then select an
AMI. For more information, see Application and OS Images (Amazon Machine Image).
-
Under Instance type, select the instance type that meets your
requirements for the hardware configuration and size of your
instance. For more information, see Instance type.
-
Under Key pair (login), choose an existing key pair, or choose
Create new key pair to create a new
one. For more information, see Amazon EC2 key pairs and Amazon EC2 instances.
If you choose the Proceed without key pair (Not
recommended) option, you won't be able to connect to the instance
unless you choose an AMI that is configured to allow users another way to log
in.
-
Under Network settings, use the default settings, or choose
Edit to configure the network settings
as necessary.
Security groups form part of the network settings, and define firewall rules for your
instance. These rules specify which incoming network traffic is
delivered to your instance.
For more information, see Network settings.
-
The AMI you selected includes one or more volumes of storage, including the root
device volume. Under Configure storage, you
can specify additional volumes to attach to the instance by
choosing Add new volume. For more
information, see Configure storage.
-
Under Advanced details, configure the Spot Instance request as
follows:
-
Under Purchasing option, select
the Request Spot Instances check
box.
-
You can either keep the default configuration for the Spot Instance request, or choose
Customize (at the right) to
specify custom settings for your Spot Instance request.
When you choose Customize, the following fields appear.
-
Maximum price: You can request Spot Instances at the Spot
price, capped at the On-Demand price, or you can specify
the maximum amount you're willing to pay.
If you specify a maximum price, your instances will be interrupted more frequently
than if you choose No maximum
price.
-
No maximum price: Your Spot Instance will launch at the current Spot
price. The price will never exceed the On-Demand
price. (Recommended)
-
Set your maximum price (per instance/hour): You can specify
the maximum amount you're willing pay.
-
If you specify a maximum price that is less
than the current Spot price, your Spot Instance will not
launch.
-
If you specify a maximum price that is more than the current Spot price, your Spot Instance
will launch and be charged at the current Spot
price. After your Spot Instance is running, if the Spot
price rises above your maximum price, Amazon EC2
interrupts your Spot Instance.
-
Regardless of the maximum price you specify, you will always be charged the
current Spot price.
To review Spot price trends, see Spot Instance pricing history.
-
Request type: The Spot Instance request type that you choose determines
what happens if your Spot Instance is interrupted.
-
One-time: Amazon EC2 places a one-time request for your Spot Instance. If
your Spot Instance is interrupted, the request is not
resubmitted.
-
Persistent request: Amazon EC2 places a persistent request for
your Spot Instance. If your Spot Instance is interrupted, the
request is resubmitted to replenish the
interrupted Spot Instance.
If you do not specify a value, the default is a one-time request.
-
Valid to: The expiration date of a persistent Spot Instance request.
This field is not supported for one-time requests. A
one-time request
remains active until all the instances in the request
launch or you cancel the request.
-
No request expiry date: The request remains active until you
cancel it.
-
Set your request expiry date: The persistent request remains
active until the date that you specify, or until
you cancel it.
-
Interruption behavior: The behavior that you choose determines
what happens when a Spot Instance is interrupted.
-
For persistent requests, valid values are Stop and
Hibernate. When an instance
is stopped, charges for EBS volume storage
apply.
Spot Instances now use the same hibernation functionality as On-Demand Instances. To enable
hibernation, you can either choose
Hibernate here, or you can
choose Enable from the
Stop - Hibernate behavior
field, which appears lower down in the launch
instance wizard. For the hibernation
prerequisites, see Prerequisites for Amazon EC2 instance hibernation.
-
For one-time requests, only
Terminate is valid.
If you do not specify a value, the default is Terminate, which
is not valid for a persistent Spot Instance request. If you keep
the default and try to launch a persistent Spot Instance request,
you'll get an error.
For more information, see Behavior of Spot Instance interruptions.
-
On the Summary panel, for Number of
instances, enter the number of instances to
launch.
Amazon EC2 creates a separate request for each Spot Instance.
-
On the Summary panel, review the details of your instance, and
make any necessary changes. After you submit your Spot Instance request,
you can't change the parameters of the request. You can navigate
directly to a section in the launch instance wizard by choosing
its link in the Summary panel.
For more information, see Summary.
-
When you're ready to launch your instance, choose Launch
instance.
If the instance fails to launch or the state immediately goes to
terminated instead of running, see Troubleshoot instance launch issues.
- Old console
-
To create a Spot Instance request using the launch instance wizard
Open the Amazon EC2 console at
https://console.aws.amazon.com/ec2/.
-
In the navigation bar at the top of the screen, select a Region.
-
From the Amazon EC2 console dashboard, choose Launch
Instance.
-
On the Choose an Amazon Machine Image (AMI) page, choose an AMI. For more information, see
Step 1: Choose an Amazon Machine Image (AMI).
-
On the Choose an Instance Type page , select the hardware configuration and size of the
instance to launch, and then choose Next: Configure Instance Details. For more information, see
Step 2: Choose an Instance
Type.
-
On the Configure Instance Details page, configure the Spot Instance request
as follows:
-
Number of instances: Enter the number of
instances to launch.
Amazon EC2 creates a separate request for each Spot Instance.
-
(Optional) To help ensure that you maintain the correct number of
instances to handle demand on your application, you can choose
Launch into Auto Scaling Group to create a
launch configuration and an Auto Scaling group. Auto Scaling scales
the number of instances in the group according to your
specifications. For more information, see the Amazon EC2 Auto Scaling User Guide.
-
Purchasing option: Choose Request Spot
instances to launch a Spot Instance. When you choose this
option, the following fields appear.
-
Current price: The current Spot price in each Availability Zone is
displayed for the instance type that you selected.
-
(Optional) Maximum price: You can leave the field empty, or you
can specify the maximum amount you're willing to pay.
If you specify a maximum price, your instances will be interrupted more frequently
than if you leave the field empty.
-
If you specify a maximum price that is less
than the Spot price, your Spot Instance will not
launched.
-
If you specify a maximum price that is more
than the current Spot price, your Spot Instance will launch
and be charged at the current Spot price. After
your Spot Instance is running, if the Spot price rises
above your maximum price, Amazon EC2 interrupts your
Spot Instance.
-
Regardless of the maximum price you specify,
you will always be charged the current Spot
price.
-
If you leave the field empty, you'll pay the
current Spot price.
-
Persistent request: Choose Persistent
request to resubmit the Spot Instance request if your Spot Instance is
interrupted.
-
Interruption behavior: By default, the Spot service terminates a
Spot Instance when it is interrupted. If you choose Persistent request, you can then specify that the
Spot service stops or hibernates your Spot Instance when it's interrupted.
For more information, see Behavior of Spot Instance interruptions.
-
(Optional) Request valid to: Choose Edit to specify when the Spot Instance request
expires.
For more information about configuring your Spot Instance, see Step 3: Configure Instance
Details.
-
The AMI you selected includes one or more volumes of storage, including the root device
volume. On the Add Storage page, you can specify
additional volumes to attach to the instance by choosing Add New
Volume. For more information, see Step 4: Add Storage.
-
On the Add Tags page, specify tags
by providing key and value combinations. For more information, see Step 5: Add Tags.
-
On the Configure Security Group page, use a security group to define
firewall rules for your instance. These rules specify which incoming network
traffic is delivered to your instance. All other traffic is ignored. (For
more information about security groups, see Amazon EC2 security groups for Linux instances.)
Select or create a security group, and then choose Review and
Launch. For more information, see Step 6: Configure Security
Group.
-
On the Review Instance Launch page, check the details of your
instance, and make any necessary changes by choosing the appropriate
Edit link. When you are ready, choose
Launch. For more information, see Step 7: Review Instance Launch and
Select Key Pair.
-
In the Select an existing key pair or create a new key pair dialog
box, you can choose an existing key pair, or create a new one. For example,
choose Choose an existing key pair, then select the key
pair that you created when getting set up. For more information, see Amazon EC2 key pairs and Amazon EC2 instances.
If you choose the Proceed without key pair
option, you won't be able to connect to the instance unless you choose
an AMI that is configured to allow users another way to log in.
-
To launch your instance, select the acknowledgment check box, then choose
Launch Instances.
If the instance fails to launch or the state immediately goes to
terminated instead of running, see Troubleshoot instance launch issues.
- AWS CLI
-
To create a Spot Instance request using run-instances
Use the run-instances
command and specify the Spot Instance options in the --instance-market-options
parameter.
aws ec2 run-instances \
    --image-id ami-0abcdef1234567890 \
    --instance-type t2.micro \
    --count 5 \
    --subnet-id subnet-08fc749671b2d077c \
    --key-name MyKeyPair \
    --security-group-ids sg-0b0384b66d7d692f9 \
    --instance-market-options file://spot-options.json
The following is the data structure to specify in the JSON file for
--instance-market-options. You can also specify
ValidUntil and
InstanceInterruptionBehavior. If you do not specify a
field in the data structure, the default value is used.
The following example creates a persistent request.
{
  "MarketType": "spot",
  "SpotOptions": {
    "SpotInstanceType": "persistent"
  }
}
To create a Spot Instance request using request-spot-instances
Use the request-spot-instances command to create a one-time request.
aws ec2 request-spot-instances \
    --instance-count 5 \
    --type "one-time" \
    --launch-specification file://specification.json
Use the request-spot-instances command to create a persistent request.
aws ec2 request-spot-instances \
    --instance-count 5 \
    --type "persistent" \
    --launch-specification file://specification.json
For example launch specification files to use with these commands, see Spot Instance request example launch specifications. If you download a launch
specification file from the Spot Requests console, you must use the
request-spot-fleet command instead (the Spot Requests
console specifies a Spot Instance request using a Spot Fleet).
Find your Spot Instances
Amazon EC2 launches a Spot Instance when capacity is available. A Spot Instance runs until it is interrupted or
you terminate it yourself.
A Spot Instance appears in the Instances page in the console,
along with On-Demand Instances. Use the following procedure to find your Spot Instances.
- Console
-
To find your Spot Instances using the console
-
Open the Amazon EC2 console at
https://console.aws.amazon.com/ec2/.
-
In the navigation pane, choose Instances.
-
To find all Spot Instances, in the search pane, choose Instance lifecycle=spot.
-
To verify that an instance is a Spot Instance, select the instance, choose the
Details tab, and check the value of Lifecycle.
The value for a Spot Instance is spot and the value for an On-Demand Instance is normal.
- AWS CLI
-
To find your Spot Instances using the AWS CLI
Use the describe-instances
command with the --filters option.
aws ec2 describe-instances \
    --filters "Name=instance-lifecycle,Values=spot"
To determine whether an instance is a Spot Instance
Use the describe-instances command, using the
--query option to check the lifecycle value.
aws ec2 describe-instances \
    --instance-ids i-0123a456700123456 \
    --query "Reservations[*].Instances[*].InstanceLifecycle" \
    --output text
If the output is spot, the instance is a Spot Instance. If there is no output,
the instance is an On-Demand Instance.
Use the following procedure to find the Spot Instances launched from a specific Spot Instance or Spot Fleet request.
- Console
-
To find the Spot Instances for a request using the console
-
Open the Amazon EC2 console at
https://console.aws.amazon.com/ec2/.
-
In the navigation pane, choose Spot Requests.
The list contains both Spot Instance requests and Spot Fleet requests.
-
If a Spot Instance request is fulfilled,
Capacity is the ID of the Spot Instance. For a Spot Fleet,
Capacity indicates how much of the requested
capacity has been fulfilled. To view the IDs of the instances in a Spot Fleet,
choose the expand arrow, or select the fleet and choose
Instances.
-
For a Spot Fleet, Capacity indicates how much of the requested
capacity is fulfilled. To view the IDs of the instances in a Spot Fleet,
choose the fleet ID to open its details page and locate the
Instances pane.
- AWS CLI
-
To find the Spot Instances for a request using the AWS CLI
Use the describe-spot-instance-requests command with the
--query option.
aws ec2 describe-spot-instance-requests \
    --query "SpotInstanceRequests[*].{ID:InstanceId}"
The following is example output:
[
    {
        "ID": "i-1234567890abcdef0"
    },
    {
        "ID": "i-0598c7d356eba48d7"
    }
]
To help categorize and manage your Spot Instance requests, you can tag them with custom metadata.
You can assign a tag to a Spot Instance request when you create it, or afterward. You can
assign tags using the Amazon EC2 console or a command line tool.
When you tag a Spot Instance request, the instances and volumes that are launched by the
Spot Instance request are not automatically tagged. You need to explicitly tag the instances
and volumes launched by the Spot Instance request. You can assign a tag to a Spot Instance and volumes
during launch, or afterward.
For more information about how tags work, see Tag your Amazon EC2 resources.
Prerequisites
Grant the user the permission to tag resources. For more information about IAM
policies and example policies, see Example: Tag resources.
The IAM policy you create is determined by which method you use for creating a
Spot Instance request.
To grant a user the permission to tag resources when using the launch
instance wizard or run-instances
Create a IAM policy that includes the following:
-
The ec2:RunInstances action. This grants the user
permission to launch an instance.
-
For Resource, specify spot-instances-request. This allows
users to create Spot Instance requests, which request Spot Instances.
-
The ec2:CreateTags action. This grants the user
permission to create tags.
-
For Resource, specify *. This allows users to tag all
resources that are created during instance launch.
{
    "Version": "2012-10-17",
    "Statement": [
        {
            "Sid": "AllowLaunchInstances",
            "Effect": "Allow",
            "Action": [
                "ec2:RunInstances"
            ],
            "Resource": [
                "arn:aws:ec2:us-east-1::image/*",
                "arn:aws:ec2:us-east-1:*:subnet/*",
                "arn:aws:ec2:us-east-1:*:network-interface/*",
                "arn:aws:ec2:us-east-1:*:security-group/*",
                "arn:aws:ec2:us-east-1:*:key-pair/*",
                "arn:aws:ec2:us-east-1:*:volume/*",
                "arn:aws:ec2:us-east-1:*:instance/*",
                "arn:aws:ec2:us-east-1:*:spot-instances-request/*"
            ]
        },
        {
            "Sid": "TagSpotInstanceRequests",
            "Effect": "Allow",
            "Action": "ec2:CreateTags",
            "Resource": "*"
        }
    ]
}
When you use the RunInstances action to create Spot Instance requests and tag the
Spot Instance requests on create, you need to be aware of how Amazon EC2 evaluates the
spot-instances-request resource in the RunInstances
statement it is evaluated in the IAM policy as follows:
-
If you don't tag a Spot Instance request on create, Amazon EC2 does not evaluate the
spot-instances-request resource in the RunInstances
statement.
-
If you tag a Spot Instance request on create, Amazon EC2 evaluates the
spot-instances-request resource in the RunInstances
statement.
Therefore, for the spot-instances-request resource, the following
rules apply to the IAM policy:
-
If you use RunInstances to create a Spot Instance request and you don't intend to tag the Spot Instance
request on create, you don’t need to explicitly allow the
spot-instances-request resource; the call will
succeed.
-
If you use RunInstances to create a Spot Instance request and intend to tag the Spot Instance request on
create, you must include the spot-instances-request
resource in the RunInstances allow statement, otherwise the call
will fail.
-
If you use RunInstances to create a Spot Instance request and intend to tag the Spot Instance request on
create, you must specify the spot-instances-request
resource or include a * wildcard in the CreateTags
allow statement, otherwise the call will fail.
For example IAM policies, including policies that are not supported for Spot Instance requests,
see Work with Spot Instances.
To grant a user the permission to tag resources when using
request-spot-instances
Create a IAM policy that includes the following:
-
The ec2:RequestSpotInstances action. This grants the user permission to
create a Spot Instance request.
-
The ec2:CreateTags action. This grants the user permission to create tags.
-
For Resource, specify spot-instances-request. This allows
users to tag only the Spot Instance request.
{
    "Version": "2012-10-17",
    "Statement": [
        {
            "Sid": "TagSpotInstanceRequest",
            "Effect": "Allow",
            "Action": [
                "ec2:RequestSpotInstances",
                "ec2:CreateTags"
            ],
            "Resource": "arn:aws:ec2:us-east-1:111122223333:spot-instances-request/*"
}
Tag a new Spot Instance request
- Console
-
To tag a new Spot Instance request using the console
-
Follow the Create a Spot Instance request procedure.
-
To add a tag, on the Add Tags page, choose Add
Tag, and enter the key and value for the tag. Choose
Add another tag for each additional tag.
For each tag, you can tag the Spot Instance request, the Spot Instances, and the volumes with the same
tag. To tag all three, ensure that Instances,
Volumes, and Spot Instance Requests
are selected. To tag only one or two, ensure that the resources you want
to tag are selected, and the other resources are cleared.
-
Complete the required fields to create a Spot Instance request, and then choose
Launch. For more information, see Create a Spot Instance request.
- AWS CLI
-
To tag a new Spot Instance request using the AWS CLI
To tag a Spot Instance request when you create it, configure the Spot Instance request configuration as
follows:
-
Specify the tags for the Spot Instance request using the --tag-specification
parameter.
-
For ResourceType, specify spot-instances-request. If you
specify another value, the Spot Instance request will fail.
-
For Tags, specify the key-value pair. You can specify more than one
key-value pair.
In the following example, the Spot Instance request is tagged with two tags: Key=Environment and
Value=Production, and Key=Cost-Center and Value=123.
aws ec2 request-spot-instances \
    --instance-count 5 \
    --type "one-time" \
    --launch-specification file://specification.json \
    --tag-specification 'ResourceType=spot-instances-request,Tags=[{Key=Environment,Value=Production},{Key=Cost-Center,Value=123}]'
Tag an existing Spot Instance request
- Console
-
To tag an existing Spot Instance request using the console
After you have created a Spot Instance request, you can add tags to the Spot Instance request using the
console.
Open the Amazon EC2 console at
https://console.aws.amazon.com/ec2/.
-
In the navigation pane, choose Spot Requests.
-
Select your Spot Instance request.
-
Choose the Tags tab and choose Create
Tag.
To tag an existing Spot Instance using the
console
After your Spot Instance request has launched your Spot Instance, you can add tags to the instance using the
console. For more information, see Add and delete tags on an individual resource.
- AWS CLI
-
To tag an existing Spot Instance request or Spot Instance using the AWS CLI
Use the create-tags command to tag
existing resources. In the following example, the existing Spot Instance request and the
Spot Instance are tagged with Key=purpose and Value=test.
aws ec2 create-tags \
    --resources sir-08b93456 i-1234567890abcdef0 \
    --tags Key=purpose,Value=test
- Console
-
To view Spot Instance request tags using the console
Open the Amazon EC2 console at
https://console.aws.amazon.com/ec2/.
-
In the navigation pane, choose Spot Requests.
-
Select your Spot Instance request and choose the Tags tab.
- AWS CLI
-
To describe Spot Instance request tags
You can view the tags of a Spot Instance request by describing the Spot Instance request.
Use the describe-spot-instance-requests command to view the configuration
of the specified Spot Instance request, which includes any tags that were specified for
the request.
aws ec2 describe-spot-instance-requests \
    --spot-instance-request-ids sir-EXAMPLE1 \
    --query "SpotInstanceRequests[*].Tags"
The following is example output.
[
    [
        {
            "Key": "Environment",
            "Value": "Production"
        },
        {
            "Key": "Department",
            "Value": "101"
        }
    ]
]
Cancel a Spot Instance request
If you no longer want your Spot Instance request, you can cancel it. You can only cancel Spot Instance
requests that are open, active, or
disabled.
-
Your Spot Instance request is open when your request has not
yet been fulfilled and no instances have been launched.
-
Your Spot Instance request is
active when your request has been fulfilled and Spot Instances have launched
as a result.
-
Your Spot Instance request is disabled when you stop your Spot Instance.
If your Spot Instance request is active and has an associated running Spot Instance, canceling
the request does not terminate the instance. For more information about terminating
a Spot Instance, see Terminate a Spot Instance.
- Console
-
To cancel a Spot Instance request using the console
-
Open the Amazon EC2 console at
https://console.aws.amazon.com/ec2/.
-
In the navigation pane, choose Spot Requests.
-
Select the Spot Instance request.
-
Choose Actions, Cancel request.
-
(Optional) If you are finished with the associated Spot Instances, you can terminate them. In the
Cancel Spot request dialog box, select
Terminate instances, and then choose
Confirm.
- AWS CLI
-
To cancel a Spot Instance request using the AWS CLI
Use the cancel-spot-instance-requests command to cancel the specified
Spot Instance request.
aws ec2 cancel-spot-instance-requests --spot-instance-request-ids sir-08b93456
Stop a Spot Instance
If you don’t need your Spot Instances now, but you want to restart them later without losing the
data persisted in the Amazon EBS volume, you can stop them. The steps for stopping a Spot Instance
are similar to the steps for stopping an On-Demand Instance.
While a Spot Instance is stopped, you can modify some of its instance attributes, but not the
instance type.
We don't charge usage for a stopped Spot Instance, or data transfer fees, but we do
charge for the storage for any Amazon EBS volumes.
Limitations
-
You can only stop a Spot Instance if the Spot Instance was launched from a persistent Spot Instance
request.
-
You can't stop a Spot Instance if the associated Spot Instance request is cancelled. When the Spot Instance request
is cancelled, you can only terminate the Spot Instance.
-
You can't stop a Spot Instance if it is part of a fleet or launch group, or Availability Zone
group.
- Console
-
To stop a Spot Instance using the console
Open the Amazon EC2 console at
https://console.aws.amazon.com/ec2/.
-
In the navigation pane, choose Instances.
-
Select the Spot Instance. If you didn't save the instance ID of the Spot Instance,
see Find your Spot Instances.
-
Choose Instance state,
Stop instance.
-
When prompted for confirmation, choose
Stop.
- AWS CLI
-
To stop a Spot Instance using the AWS CLI
Use the stop-instances
command to manually stop your Spot Instances.
aws ec2 stop-instances --instance-ids i-1234567890abcdef0
Start a Spot Instance
You can start a Spot Instance that you previously stopped.
Prerequisites
You can only start a Spot Instance if:
-
You manually stopped the Spot Instance.
-
The Spot Instance is an EBS-backed instance.
-
Spot Instance capacity is available.
-
The Spot price is lower than your maximum price.
The steps for starting a Spot Instance are similar to the steps for starting an On-Demand Instance.
- Console
-
To start a Spot Instance using the console
Open the Amazon EC2 console at
https://console.aws.amazon.com/ec2/.
-
In the navigation pane, choose Instances.
-
Select the Spot Instance. If you didn't save the instance ID of the Spot Instance,
see Find your Spot Instances.
-
Choose Instance state,
Start instance.
- AWS CLI
-
To start a Spot Instance the AWS CLI
Use the start-instances
command to manually start your Spot Instances.
aws ec2 start-instances --instance-ids i-1234567890abcdef0
Terminate a Spot Instance
If you terminate a running or stopped Spot Instance that was launched by a persistent Spot Instance request,
the Spot Instance request transitions to the open state so that a new Spot Instance can
be launched. To ensure that no new Spot Instance is launched, you must first cancel the Spot Instance
request.
If you cancel an active Spot Instance request that has a running Spot Instance, the running Spot Instance
is not automatically terminated; you must manually terminate the Spot Instance.
If you cancel a disabled Spot Instance request that has a stopped Spot Instance, the stopped
Spot Instance is automatically terminated by the Amazon EC2 Spot service. There might be a
short lag between when you cancel the Spot Instance request and when the Spot service
terminates the Spot Instance.
For more information, see Cancel a Spot Instance request.
- Console
-
To manually terminate a Spot Instance using the console
-
Before you terminate an instance, verify that you won't lose any data by
checking that your Amazon EBS volumes won't be deleted on termination and that
you've copied any data that you need from your instance store volumes to
persistent storage, such as Amazon EBS or Amazon S3.
-
Open the Amazon EC2 console at
https://console.aws.amazon.com/ec2/.
-
In the navigation pane, choose Instances.
-
Select the Spot Instance. If you didn't save the instance ID of the Spot Instance,
see Find your Spot Instances.
-
Choose Instance state, Terminate instance.
-
Choose Terminate when prompted for confirmation.
- AWS CLI
-
To manually terminate a Spot Instance using the AWS CLI
Use the terminate-instances command to manually terminate your Spot Instances.
aws ec2 terminate-instances --instance-ids i-1234567890abcdef0 i-0598c7d356eba48d7